Back to top
Overview
- The Camera App was designed with simplicity in mind
- Put it down, calibrate it once, then you should not bother it much during the training
- The buttons on the left are the main
functions
- The buttons on the right are the sub
functions
- Which buttons appear on the right depend on what you choose on the left
- Buttons may change their color: green is good, red is, well, that's bad

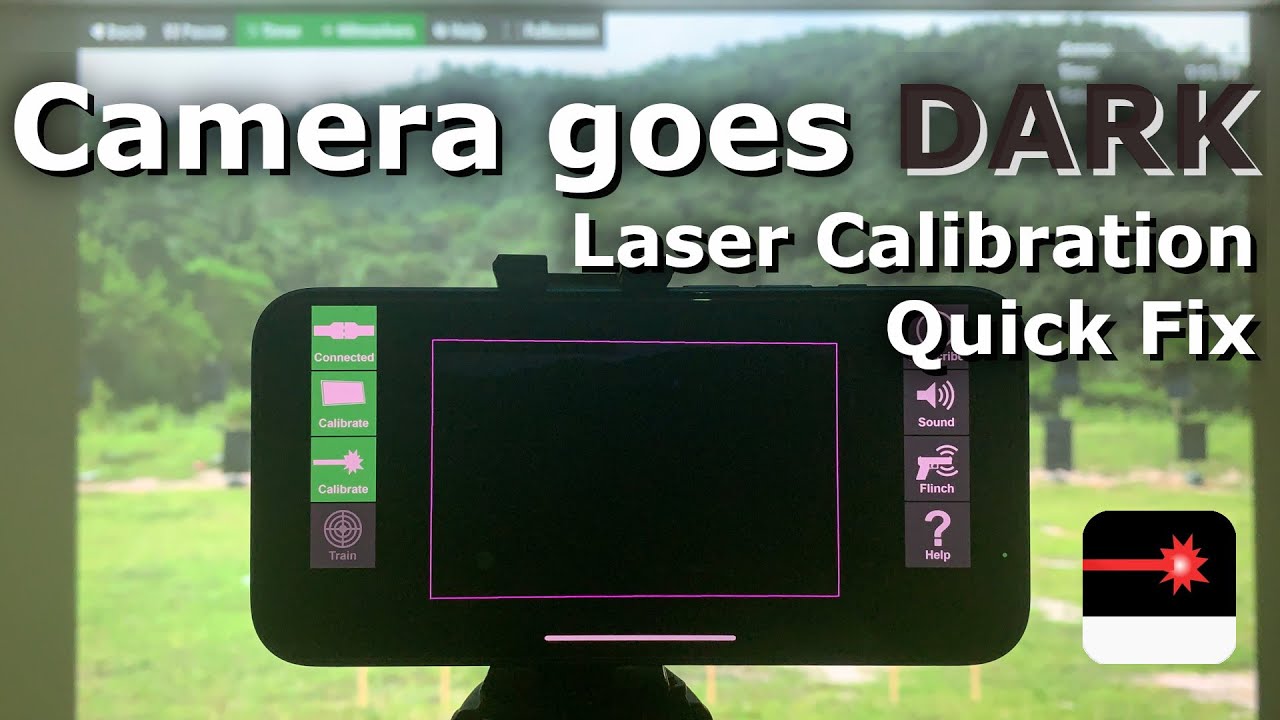
- Setting up the camera involves two calibration steps
- 1) Screen Calibration means that the Camera App needs to know where the
screen is, where it should scan for the laser
- 2) Laser Calibration means that the Camera App needs to adjust the
exposure settings to a level where the image is neither too bright (false hits detected) nor too dark
(no laser would be detected at all)
- Both steps can be performed automatically via Automatic Calibration,
and that works fine under most conditions
- But not always: In this case there is Manual Calibration for both steps
- You can recalibrate anytime, should conditions can change during the
training session, like when the sun comes up, shines at your screen, that messes up the laser detection
Back to top
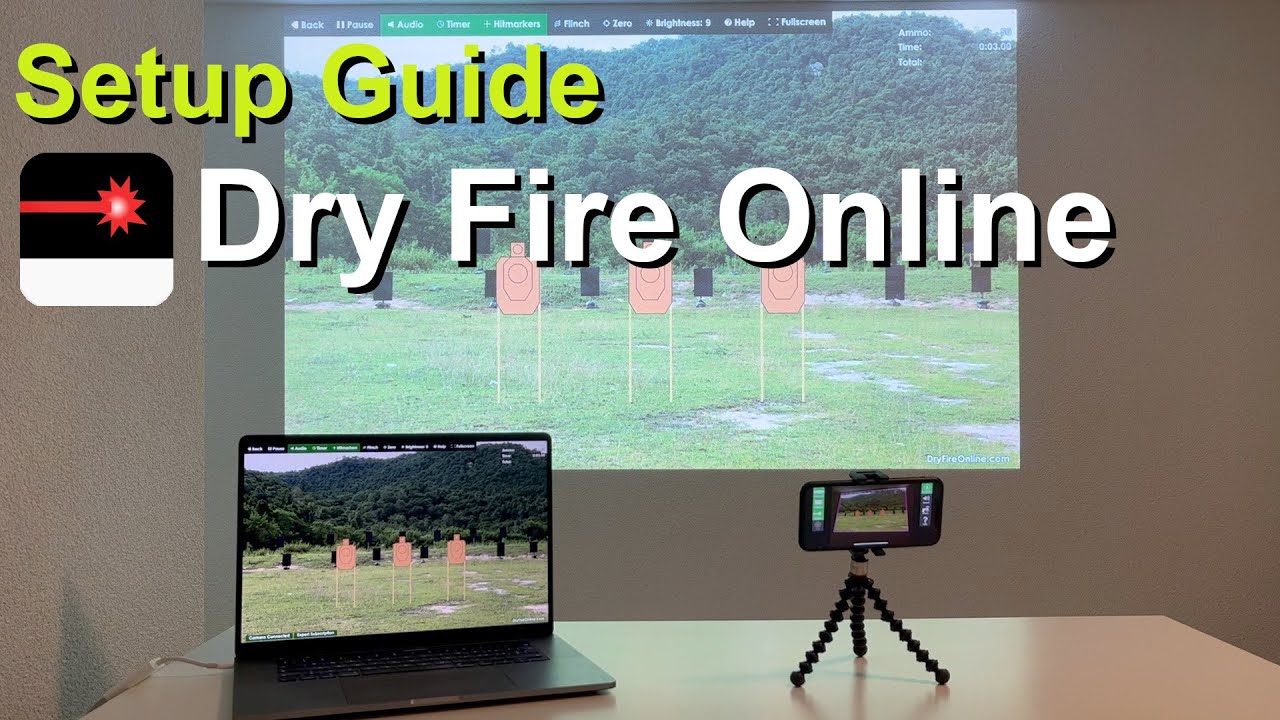
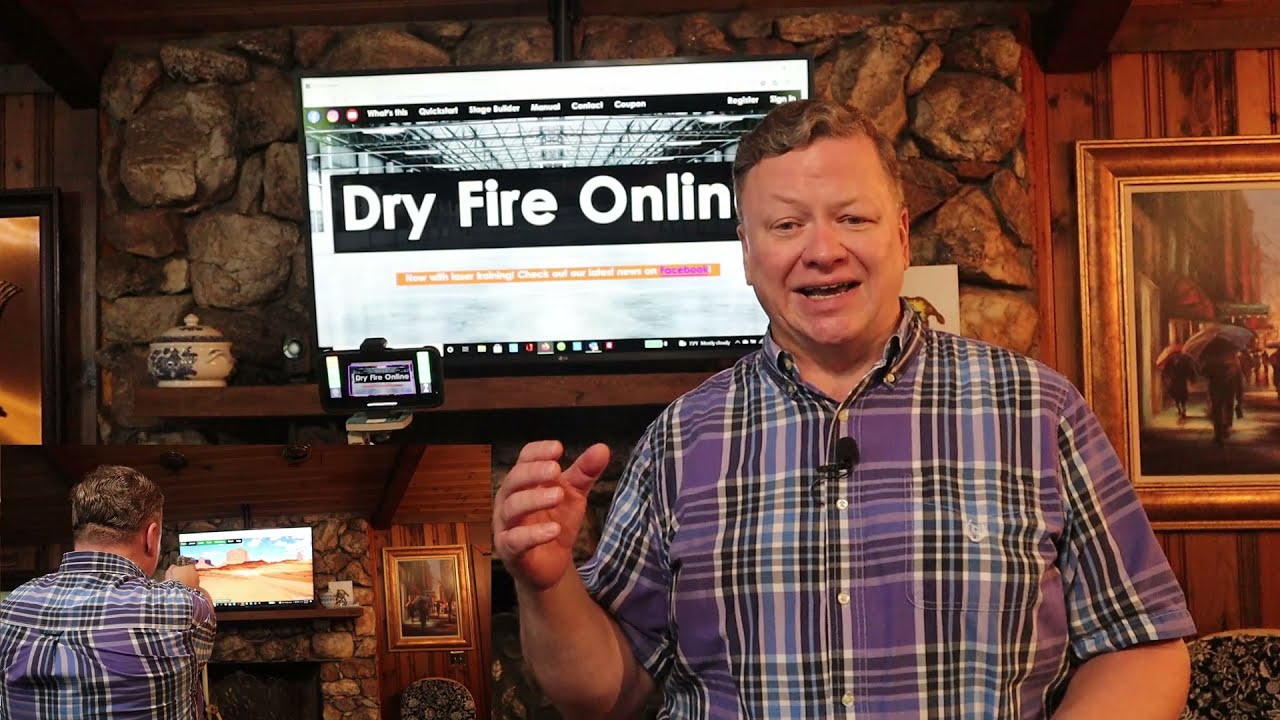
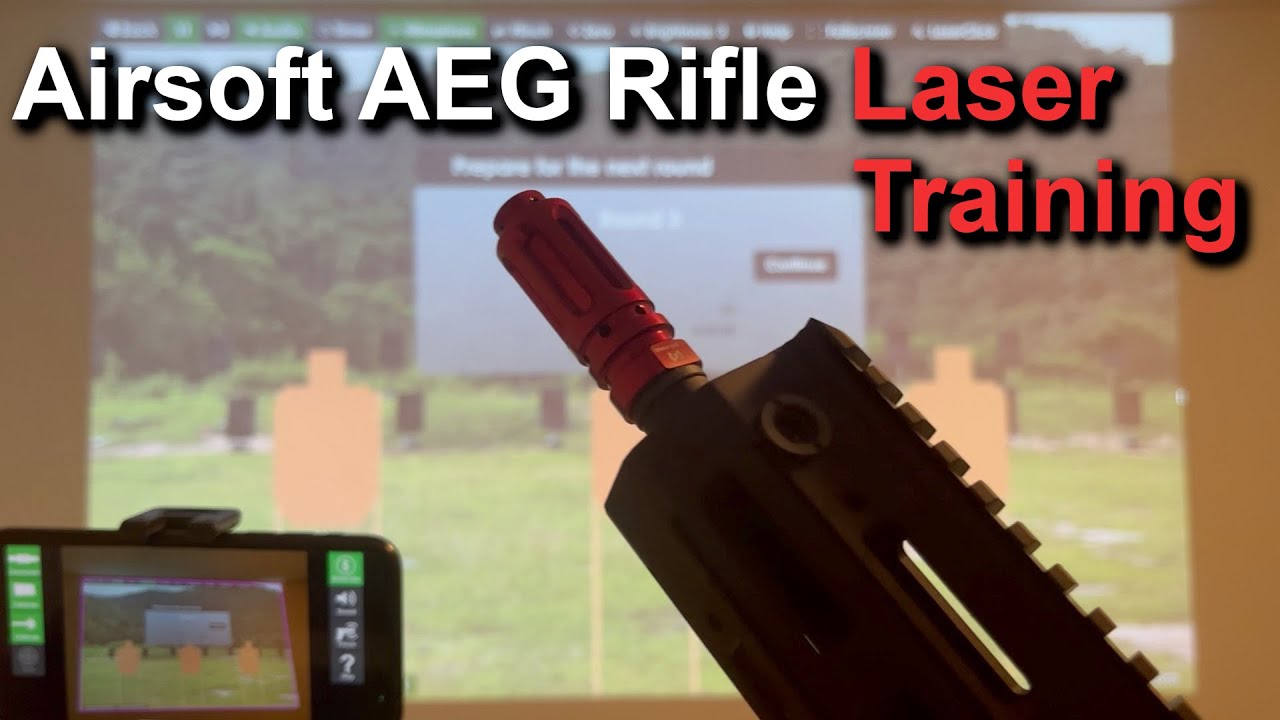
Camera App Quick Setup Guide Video
Step 1) Download the DryFireOnline app on the Apple App Store or get it on Google Play

Try it for FREE: Unlimited stages and 2 shots (double tap) per round
even without a subscription!
Step 2) Watch the videos below and learn more about the setup process. Find more tips and tricks in the
How-To and Troubleshooting sections of the Manual.
What you need / System Requirements
Detailed Setup Guide
Screen Calibration
Laser Calibration
Back to top
More Videos
Reviews, tutorials and setup guides:
Back to top
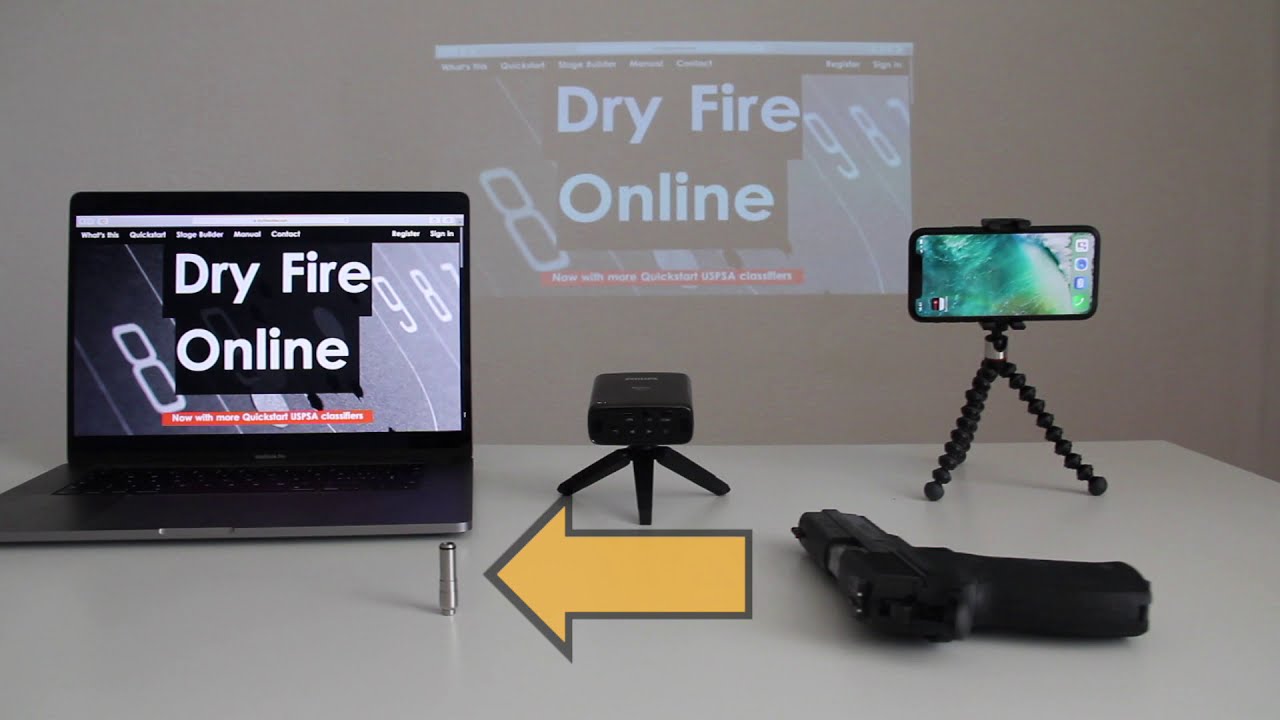
What you need
Let’s check if you have everything required to train with the Camera App! You need:
- Internet connection - possibly a fast one
- An Apple iOS or Android smartphone or table where you can install the
DryFireOnline Camera App and that will serve as your camera
- Camera mount or something that can hold the camera steady
- A separate notebook, tablet (or anything) with a web browser,
where you can display the
dryfireonline.com website and start the stage
- A laser training cartridge or a training gun that emits a laser
light in the visible spectrum
and creates a visible (most often red or green) dot on the wall read
more
- A projector or a flat screen display, that's connected to the notebook
or tablet (or
anything) read more
Budget Philips Projectors on Amazon
Philips, Neopix 150 home theater projector, Full HD 1920 x 1080p, 180 degree rot...
$139.00
Philips, Neopix 250 Home Cinema Projector, Full HD 1920 x 1080p, 180 Degree Rota...
$169.00
Philips, Neopix 450 SMART, Home cinema projector, Full HD 1920 x 1080p, 500 Lume...
$229.00
Philips NeoPix 750 Smart Home Theater Video Projector, 1920 x 1080 Full HD, 120-...
Epson Projectors on Amazon
Epson EpiqVision Flex CO-W01 Portable Projector 3-Chip 3LCD, Widescreen, 3000 Lu...
$329.99
Epson EX3290 3-Chip 3LCD Widescreen WXGA Video Projector with Built-In Speaker, ...
$599.99
Epson Lifestudio Pop Full HD Personal Lifestyle Projector 700 Lumens of Color an...
$619.00
Epson EpiqVision Mini EF22 Portable Smart Laser Projector, Bright 1,000 Lumens, ...
$942.98
Epson EpiqVision Ultra Short Throw LS300 3LCD Smart Laser Projector, 3600 Lumens...
Phone stands and tripods
GripTight ONE Mount (Black)
Joby GripTight Smartphone/Action Camera Flexible Tripod Stand Kit, Black/Charcoa...
ULANZI iPad Phone Tripod Mount Adapter with Cold Shoe, Universal Smartphone Tabl...
U-pad III Aluminum iPad Tripod Adapter - 7.9-12.9in Metal Mount w Cold Shoe & Ac...
$39.95
Manfrotto Element MII Mobile Bluetooth 4-Section Carbon Fiber Traveler Tripod, B...
$191.95
Back to top
Example Range Setups
There are many ways to set up your Dry Fire Online range, here are a few examples:
1) The tablet range - small and portable
 Hey, there is a video about this one:
- Targets are displayed on the tablet screen
- The Camera App is watching the tablet screen
- The Camera App is connected to the tablet over the internet
- You aim at the tablet screen, the Camera App is detecting your shots and sending the hits to the tablet
- A laser reflecting film is applied to the tablet screen, read our flat screen setup tips
2) The notebook range
 Hey, there is a video about this one:
- Targets are displayed on the notebook screen
- The Camera App is watching the notebook screen
- The Camera App is connected to the notebook over the internet
- You aim at the notebook screen, the Camera App is detecting your shots and sending the hits to the
notebook
- A laser reflecting film - here a common punched pocket as a budget solution - is applied to the notebook
screen, read our flat screen setup tips
3) The tablet & projector range

- Targets are displayed on the tablet screen
- The tablet is connected to the projector
- Note that the tablet is connected wirelessly to the projector - it is convenient but can cause a small
delay
- The Camera App is watching the projected image
- The Camera App is connected to the tablet over the internet
- You aim at the projected image, the Camera App is detecting your shots and sending the hits to the
tablet
- You can use the tablet as a control panel to conveniently start stages and to adjust targets.
- Read our projector setup tips
4) The notebook & projector range

- Targets are displayed on the notebook screen
- The notebook is connected to the projector using an HDMI cable
- The Camera App is watching the projected image
- The Camera App is connected to the notebook over the internet
- You aim at the projected image, the Camera App is detecting your shots and sending the hits to the
notebook
- You can use the notebook as a control panel to conveniently start stages and to adjust targets
- Read our projector setup tips
4b) Use your tablet as a camera

- Same as above, but here the Camera App is installed on a tablet instead of a smart phone
5) Large flat screen range

- Did you know most Smart TVs have a built-in web browser and can directly connect to the
dryfireonline.com website and display targets?
- If you do not have a Smart TV or a projector, you can still use a common flat screen TV or computer
screen - just hook it to a notebook / tablet / game console or anything with a built-in web browser.
- Be aware that most flat screen displays do not reflect laser well, and you might have to apply a laser
reflecting film to the screen, read our flat screen setup
tips
Back to top
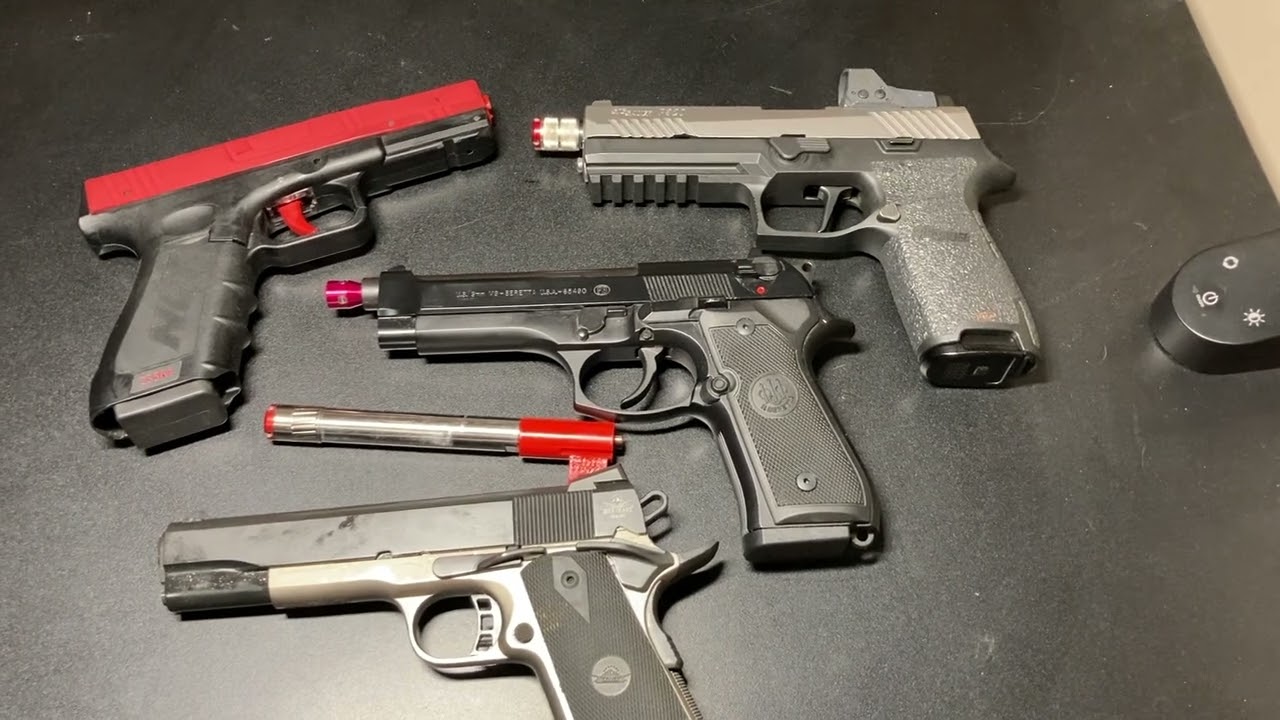
Training Guns
- Double-action (DA) and
double-action/single-action (DA/SA) handguns are one of the best options for laser
training.
- Each pull of the trigger activates the
laser cartridge so you don't have to "rack the slide".
- You can train with your own handgun, weight, grip, sights and trigger.
- The only
downside is that with DA/SA you cannot use the SA mode - you have to
manually cock the hammer for SA training.
-
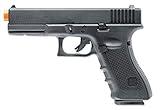
Striker fired handguns like a Glock, Sig P320
or similar:
- Rack the slide after each shot manually (well, at least it is free)
- Install a reset trigger: Reviews
- Use one of the CO2 blowback barrels mentioned below
-
Carbines and AR-15 style rifles:
-
Shotguns:
-
Alternative options and recoil management training:
- Get a dedicated laser trainer pistol: Reviews
- Use a CO2, airsoft, BB gun replica with a sound/vibration/pressure activated laser: Reviews
- Use one of the CO2/laser barrel conversion kits: Reviews
Back to top
Our Lasers
Dry Fire Online is a laser training simulator - we do no produce our own laser cartridges because Dry Fire
Online it was designed to work with any laser cartridge that fits your needs, gun and budget.
Still, there are differences between the lasers that are available on the market, and we receive many
questions about the lasers we use. Here we share our personal experiences and subjective opinions - your
experience and opinion may differ. Make your own research and choose the product that best fits your needs.
- We cannot guarantee that a each and every laser cartridge is going to work with your setup (room,
ambient light conditions,
projector,
gun, phone, cartridge), but we do know which ones perform well (and not so well) with our setup.
- Dry Fire Online was designed to work with visible red and green laser cartridges.
- IR (infrared) lasers are not going to work with our Camera
App
Back to top
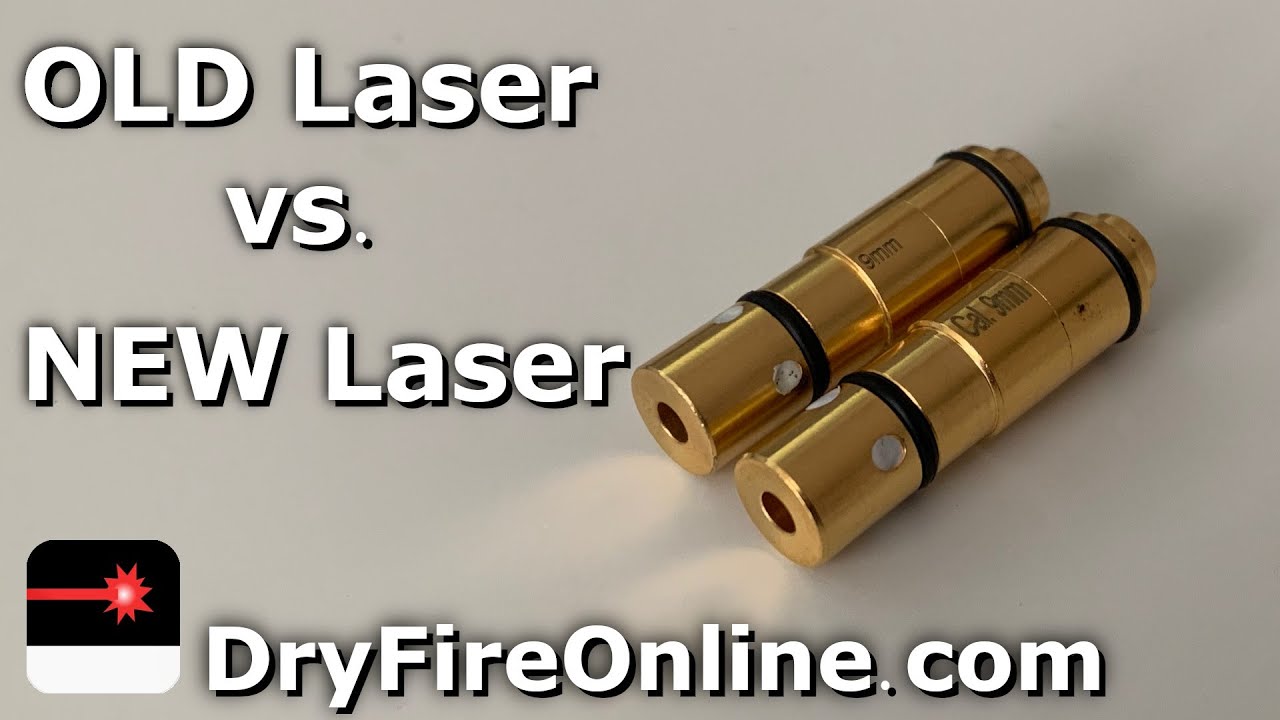
iTarget and Mantis Pink Rhino 9mm
★ ★ ★ ★ ★
Both our iTarget and the Pink Rhino cartridges are 9mm chamber insert cartridges, but available in other
calibers as well. Here is the iTarget:

Mantis Pink Rhino 9mm:

- These cartridges work great with the Camera App
- We got the iTarget first, then, when we purchased the Mantis Pink Rhino it turned out that these
cartridges are the same, just branded differently. Same dimensions, same internals, same spare
batteries. There are also similarly looking cartridges on the market under some exotic names, but we
suspect that all these cartridges come from the same factory.
- We are really happy with the quality: the iTarget survived 10000+ dry fire shots, the battery had to be
replaced once, but the laser is still bright and running - no detection issues.
- The price is also great - these are one of the most affordable cartridges. Good quality + good price =
great value.
- We purchased some "same looking but differently branded" cartridges on the internet. The first one
worked fine out of the box, but died after the first time the firing pin hit it's back cap (at least it
was cheap), the other one is still running.
- These cartridges emit the laser as long as the rubber button keeps pressed - it’s a simple on/off
button. It means that the duration of the laser shot depends on the firing pin of the gun and the spring
- and that might differ from one gun to another, but it wasn’t a problem for us. In our tests, with all
our guns, these cartridges perform great.
-
There is no extraction groove at the bottom of the cartridges where the extractor claw could engage
them. Once the cartridge is in the chamber, the slide can be racked, it's not going to pull out the
cartridge. An empty magazine can also be inserted into the gun to do some reload drills.
Spot the difference: iTarget vs Mantis Pink Rhino


Back to
top
Laser Ammo SureStrike 9mm
★ ★ ★ ★ ☆

- The Laser Ammo SureStrike was the first cartridge we bought. In fact the very first iOS version of the
Camera App was based on and tested with the StureStrike cartridge.
- It shows that the SureStrike works well out of the box and the Camera App has no issues with detecting
the laser. We still have mixed feelings about this cartridge.
- The price is higher than what an iTarget or a Mantis Pink Rhino costs.
- The SureStrike is also technically superior: it emits the laser for a fixed (ca. 0.1 sec) duration. When
the rubber button is pressed once - it doesn’t matter if you keep (and how long) the button pressed -
the red dot always appears for the same amount of time. It means that the duration of the laser impulse
does NOT depend on the firing pin and its spring. This way the SureStrike can provide consistent results
in different guns and that is better than a simple on/off button of budget cartridges.
- As an added bonus the 9mm SureStrike laser module is interchangeable with the one that is inside the
SureStrike Spider with a vibration cap.
- But we had some quality issues: The first cartridge got dimmer after about 2000 dry fire shots: the red
dot was still visible to the naked eye, but it was noticeably weaker and that caused detection issues
with the Camera App. Replacing the batteries
didn’t help, it must have been the laser module. Maybe we
got a lemon, it can happen, no manufacturer is 100% perfect, it was replaced under warranty. The second
one was much better, it lasted for 5000 shots before it got dim. Now we use the third one, and it's
still one of our favorites.
Back to top
Smart DryFireMag with Laser for Glock and Sig P320
★ ★ ★ ★ ★
Striker fired handguns, like Glocks or the Sig P320, don't have double strike capability. That means once the
striker is under tension and the trigger is pulled, the firing pin can hit the cartridge one just once.
Pulling the trigger repeatedly (without racking the slide and cycling the gun) cannot tension the firing pin
spring
again and hit the same cartridge multiple times - like double action handguns can do.
That's a big problem with laser training, because training with a simple laser cartridge (Pink Rhino,
iTarget, SureStrike) means that the slide shall be manually racked after each shot. Training multi-shot
scenarios requires to manually rack the slide after each shot, that makes the training cumbersome, slow and
even builds
the bad habit and training scars of racking the slide after each shot - which is unnecessary (or outright
bad) in real life scenarios.
The company DryFireMag (not to be confused with Dry Fire Online) is known for their product line of
trigger resetting magazines, including a laser capable version of their product:
the Smart DryFireMag for Glocks and for the Sig Sauer P320.
We have tested the Glock version of the Smart
DryFireMag with laser, and it wokrs well with with our Camera App, in fact, it became one of our favorites.
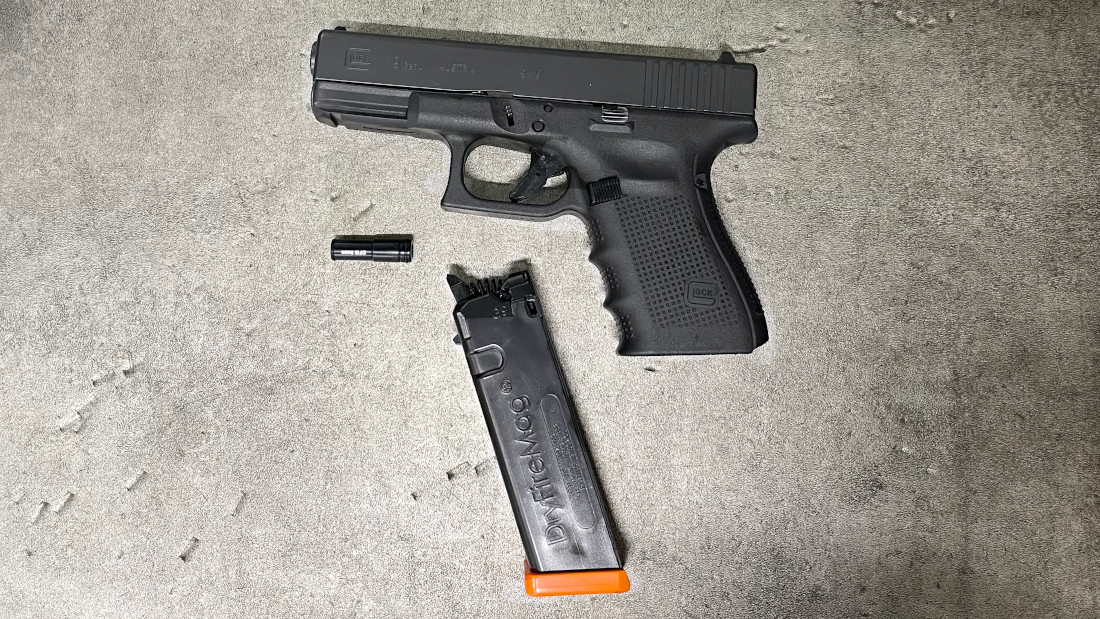
-
The Smart DryFireMag system consists of two parts: 1) a new trigger resetting magazine and 2) a
proprietary chamber
insert
laser cartridge with red laser.
-
Made in the USA.
-
The magazine wirelessly connects to the laser cartridge, that makes using it really simple. Just
insert the laser cartridge into the chamber then insert the mag and it's ready to go. No
need to modify the gun, replace the barrel or any internal components or to connect wires. Note that the
laser cartridge doesn't have a rubber button on its back. It's not activated by the firing pin, but by
an IR diode on the DryFireMag.
-
There's no stuff sticking out/attached to/from the barrel (see the CoolFire Trainer), so you can even
use your own holster. After
the training, just push the laser cartridge out of the barrel (barrel plunger included) and remove the
DryFireMag - that's it!
-
The Smart DryFireMag is currently available for various Glock and Sig Sauer P320 models.
In 2023 DryFireMag teamed up with Laser Ammo, and now they ship the Smart DryFireMag with a Laser Ammo
SureStrike cartridge in multiple calibers. We have tested the Laser Ammo
SureStrike cartridge and we liked it. The new SureStrike laser cartridge with the infrared
activated back cap:

-
The DryFireMag is set to simulate a factory Glock 5.5 - 6lb trigger weight. The trigger is replaceable,
and there's a spring kit available to simulate different trigger weights.
-
The trigger pull and the trigger travel (where the trigger breaks) can also be adjusted on the mag with
the included Allen wrench.
-
The mag has a built-in USB rechargeable battery - charging cable included. The laser cartridge comes
with button (watch) batteries. The manual advices to remove the batteries from the cartridge after each
training.

-
The slide cannot be racked once the DryFireMag is inserted - training reload scenarios and malfunction
drills is limited, but we can live with that. Being able to pull the trigger repeatedly is far more
importnat.
-
The laser appears to be somewhat weaker than the Pink Rhino/iTarget/Blackbeard so it might require
Manual Laser Calibration an/or brightness adjustments in case of
detection issues. In our tests we had a few undetected shots, but
overall it worked very well. We like it!


Back to top
CoolFire Trainer
★ ★ ★ ★ ☆
The CoolFire Trainer is a system that replaces the barrel of the pistol with a custom barrel that's
essentially a
CO2 tank. The barrel contains a piston, and when you pull the trigger, the piston can push back the slide,
cycle the gun and reset the trigger.
The kit comes with a tuned recoil spring, and if you would like to train with a laser, you can add
a vibration activated laser to the barrel (remember: choose the red laser).
The heart of the system: the barrel, the spring, and an optional laser - here you see the laser with the
Rapid Fill Adapter:
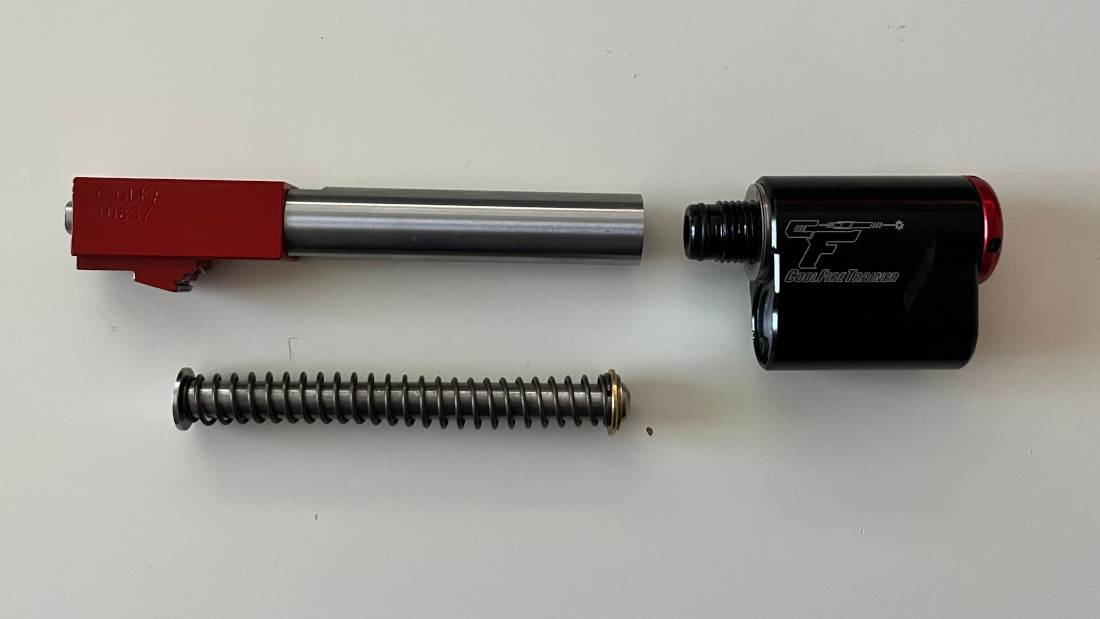
The CoolFire trainer is available for a variety of brands, including models of SIG, Glock, CZ, Walther,
Canik, S&W, Springfield, ZEV, Tanfoglio and more!
Here, it's installed in a Glock 17 with the laser module attached, being refilled with CO2 via the Rapid
Fill
Adapter:

Overall, the CoolFire Trainer is a pretty cool system. It comes with some major benefits, and some
"good to know before
you buy" features.
Pros:
-
The major advantage of the CoolFire Trainer is that you train with a gun that recoils, and you can
add recoil management to your dry fire sessions.
-
The force of the recoil impulse depends on
multiple factors (your exact gun, frame, spring, gas pressure, temperature, extender, etc.) but
it's between the recoil of a .22 and 9mm handgun, and it's enough to disrupt the sight picture.
-
Another great advantage is that you can train with your own handgun, and not just with some airsoft
replica, but your own and actual gun: your
grip, trigger, slide, sights and magazines. Did you do some trigger tuning? Do you have a red dot
installed on the slide? You can train with that.
-
It's cost effective. The system is not cheap, but if you train a lot, it's going to save you some real
money. One shot with the CoolFire trainer costs around $0.01 - $0.02 considering the price of
the gas. As for the gas: It can be refilled from commonly available SodaStream or Paintball gas tanks.
-
One refill was enough for about 20-30 shots
(GLock 17 with Rapid Refill Adapter), and it depends again on multiple factors (your barrel size,
temperature, extenders, etc).
Refilling with gas is simple and fast via the Rapid Fill Adapter. The adapter costs a bit more, but it's
recommended for serious training: The simple laser attachment should be unscrewed before each refill,
which is pretty frequent.
-
You can keep your rail attachments on (lights?), and you can even holster, and practice draws. Note, if
you attach a laser to the barrel, you need to have an open bottom holster, and appendix carry might get
difficult.
-
It's safe to train with. The barrel is red, so it's visible when it's installed. It cannot chamber nor
fire live ammunition.
-
Available for boh DA/SA and striker fired handguns.
-
You can train with or without a laser.
-
You can rack the slide, and train magazine changes: The CoolFire kit comes with a TRT (Tap Rack Train)
training aid. It's a small piece of plastic that can be loaded into the magazine. It prevents the
follower from reaching the top of the magazine, and as result, the slide is not going to lock back, and
can be racked even with an empty magazine inserted.
-
Made in the USA.
Cons:
-
The kit is not cheap. It's worth it, only if you use it.
-
Maintenance: If you don't have a dedicated training gun, you have to add and remove the barrel every
time
you train. It's also the finickiest system of all dry fire systems we tested so far. We had to lube the
gun before every training, and
when it works it's great, but when it does not, it does cause some headaches. Beyond the gas, the system
also contains some wearable parts (piston back cap, seals and o-rings) that have to be replaced once in
a while.
It's also recommended to purge any remaining gas from the barrel after the training, and before
disassembly (otherwise you may experience a serious Pop!).
-
Condensation: When the pressured gas is released from the barrel, it's going to cool down the gun. As a
result
condensation might appear on your slide and on the internal parts of the gun. How much exactly, that
depends on
your climate, temperature and relative air humidity. If you have an expensive steel frame race gun, it's
a good idea to wipe it dry after the training.
-
Precision: The problem of recoiling systems affects even the CoolFire Trainer. When the gun recoils, the
laser that the camera sees is going to draw a line, instead of a clear dot. Depending on how much your
system
recoils (frame, weight, pressure, etc) how far you stand from the screen, and how well and consistently
you can manage the recoil: the line can be shorter or longer, or it can be a vertical I or a C or U or S
shaped line. It's strongly recommended to perform Zeroing in the simulator, so the app can somewhat
compensate for this effect. Even then, precisions will be lower compared to simple non-recoiling systems
that
create a clear dot. In our experience, it's good enough to train with IPSC, USPSA, IDPSA like targets
up to 15 yards (also
depends on the target size, target zones, size on the screen, screen distance), but the CoolFire is
definitely not recommended for bullseye
shooting.
-
It's relatively loud (well, it's subjective, but still), It's like repeatedly racking the slide plus the
added
pop from the gas. So, if you have a thin walls or a baby sleeping next
door, then it's also something to consider.
Rapid Refill Adaptor: at top is the laser, the bottom is the refill valve

Delivered in a nice portable organizer with all accessories: barrel, spring, laser, tools, seals, o-rings,
silicon grease, all in one place:

The CoolFire Trainer is a great system, but only for power users. You can get it here:

Back to top
Mantis Blackbeard for AR-15, AR-10, SIG MCX and FN SCAR
★ ★ ★ ★ ★

- We saw multiple videos from our users who use AR-15 setups with the Mantis Blackbeard, so we purchased
one to test how well it works with Dry Fire Online. Since then, Mantis released new BlackbeardX versions
for AR-10, SIG MCX, FN SCAR Light and Heavy.
-
The Blackbeard has two parts: the battery that replaces the AR magazine, and the laser module that
replaces the bolt carrier group and the charging handle. It's easy to install, no modifications are
required, and it's
safe to train with.
-
The BlackbeardX is essentially the same system as the Blackbeard, but it comes with a larger (30 round)
magazine battery, that also contains the MantisX movement sensor.
-
The windage and the elevation of the laser can be simply adjusted, and there's an Always-on switch that
turns the Blackbeard into a bore sighting laser.
-
A great feature is that the Blackbeard
automatically resets the trigger, so you don't have to pull the charging handle after each shot.
- It works great, the Camera App can detect the laser without any issues. That's true for both the red and
the green laser.

Back to
top
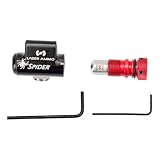
Laser Ammo Spider for Airsoft GBB
★ ★ ★ ★ ☆
-
The Laser Ammo Spider adapter is a vibration activated laser for airsoft GBB handguns and rifles.
-
It’s a housing adapter that can be attached to the picatinny rail. On the inside it contains a 9mm Laser
Ammo SureStrike cartridge.


-
This laser cartridge has a rounded vibration back cap that can detect even the tiniest vibrations, like
when the airsoft gun is fired.
-
Normal firing pin activated SureStrike cartridge with the rubber button back cap compared to a vibration
activated rounded back cap:

-
You have to pay extra attention to safety: Since the Spider is a picatinny attachment, it does not block
the chamber. You have to make sure that there are NO live rounds in the chamber and in the magazine!
-
If you train with a handgun replica: Since the Spider is attached to the rail, you might not be able to
holster the gun, unless you have a holster with extra room for a weapon light. If you already have a
weapon light on the rail, you have to remove it, so the Spider can be mounted.
-
We faced some laser detection issues with the Spider so we reached out to Laser Ammo. They confirmed
that the vibration back cap is tuned differently, and the laser impulse is indeed shorter, compared to
their normal SureStrike cartridge. That means, it’s more challenging for the camera to detect the laser,
since it’s visible only for a short amount of time.
-
Additionally, due to the recoil of the GBB, the laser draws a line on the screen, instead of a dot. The
camera tries to determine from this line where the shot should have landed, which works to some extent
but it’s not perfect. The precision of the shot detection is lower compared to a recoilless laser that
forms a clean dot. In practice, it’s good enough for dynamic shooting and short range targets, but not
good for bullseye precision shooting.
- The Spider Kit is still usable with the Camera App, but pay attention to the the following:
-
Reduce the screen brightness and/or make the room darker. That makes the laser dot brighter
relative to the screen and the environment and easier to detect.
-
Put the camera closer to the screen. That makes the laser dot bigger for the camera, and easier
to detect.
-
Switch to Manual Laser Calibration and tweak the detection settings manually (brightness and
detection threshold). Watch the Laser Calibration video.
- Perform Zeroing on the Range Screen. Your shots must be consistent (grip, tension, trigger pull)
so the line on the screen will also be consistent.
Laser Ammo Spider Adapter and Vibration Kit - SureStrike Rail Mounted Recoil Ena...
$171.00
Elite Force Glock 17 Gen4 GBB Blowback 6mm BB Pistol Airsoft Gun
$160.39
LASER AMMO Recoil Enabled Training Laser Device (Class I, 3.5mW) | Non-Projectil...
$403.75
Recoil Enabled SureStrike Training Laser Device (Class I, 3.5mW) for use Trainin...
Back to
top
Laser Ammo Flash Kit for Airsoft Rifles
★ ★ ★ ★ ★
-
The Laser Ammo Flash Kit is a vibration activated laser for airsoft rifles both AEG and GBB.
-
It’s a housing adapter that looks like a flash hider and it can be attached to the barrel thread (14mm
CCW) of most airsoft rifles. On the inside it contains a 9mm Laser Ammo SureStrike cartridge.
-
The 14mm CCW thread is the most common barrel thread on airsoft rifles. See the Manual of your rifle to
learn more about what muzzle thread your rifle has.
-
This laser cartridge has a rounded vibration back cap that can detect even the tiniest vibrations, like
when the airsoft gun is fired. It works fine on GBB and even on softer recoiling AEG rifles.
-
Normal firing pin activated SureStrike cartridge with the rubber button back cap compared to a vibration
activated rounded back cap:
-
Compared to our GBB handgun test, the AEG rifle is heavier, quieter and has a softer recoil.
-
Since the recoil impulse of the AEG rifle is much softer, the laser does not draw a line on the wall.
That means, the camera can easier and more reliably detect the shots, and even the precision is better.
You might still have to switch to Manual Laser Calibration and reduce the screen brightness, but the
overall experience was better compared to a GBB.
-
Note that the camera app can detect about 10 shots per seconds, so if you want to go full auto with an
airsoft rifle, the app might not detect each shot. We recommend that you train in semi auto mode.
-
Another reason to train in semi auto mode is to reduce unnecessary wear on the gun. The airsoft
community is divided on if dry fire is bad for AEG guns. Dry fire wears guns, even real guns, the
question is by how much. On well built guns the wear is not significant. Airsoft rifles are available in
various levels of build quality, and lower quality guns, with lower quality internals tend to break
sooner. The good news is that most airsoft rifles are serviceable, the parts are replaceable and cheap.
Evike Airsoft - Specna Arms Flex Series Airsoft M4 AEG w/GATE X-ASR (Model: SBR ...
Evike Airsoft - Specna Arms Edge Series Airsoft M4 AEG w/GATE X-ASR MOSFET (Mode...
$355.35
Back to top
Projector or Flat Screen
If you want to use the Camera App for laser training we recommend using a
projector instead of a flat
screen (TV, monitor, LED, LCD, etc) for the following reasons:
- Flat screen TVs, monitors, tablet and notebooks can have different filters built-in into their screen
panel, like
anti-glare and polarizing filters. These filters reduce the visibility (size and angle) of the reflected
laser dot
on the screen, the dot is going to loose it brightness.
- Some flat screen TVs and monitors might be damaged by high powered laser pointers. Check the
manufacturers recommendations of your screen and the “class” of the laser device.
- Flat screen means a screen that is physically flat. Curved LCD screens might cause precision issues.
Budget Philips Projectors on Amazon
Philips, Neopix 150 home theater projector, Full HD 1920 x 1080p, 180 degree rot...
$139.00
Philips, Neopix 250 Home Cinema Projector, Full HD 1920 x 1080p, 180 Degree Rota...
$169.00
Philips, Neopix 450 SMART, Home cinema projector, Full HD 1920 x 1080p, 500 Lume...
$229.00
Philips NeoPix 750 Smart Home Theater Video Projector, 1920 x 1080 Full HD, 120-...
Epson Projectors on Amazon
Epson EpiqVision Flex CO-W01 Portable Projector 3-Chip 3LCD, Widescreen, 3000 Lu...
$329.99
Epson EX3290 3-Chip 3LCD Widescreen WXGA Video Projector with Built-In Speaker, ...
$599.99
Epson Lifestudio Pop Full HD Personal Lifestyle Projector 700 Lumens of Color an...
$619.00
Epson EpiqVision Mini EF22 Portable Smart Laser Projector, Bright 1,000 Lumens, ...
$942.98
Epson EpiqVision Ultra Short Throw LS300 3LCD Smart Laser Projector, 3600 Lumens...
Phone stands and tripods
GripTight ONE Mount (Black)
Joby GripTight Smartphone/Action Camera Flexible Tripod Stand Kit, Black/Charcoa...
ULANZI iPad Phone Tripod Mount Adapter with Cold Shoe, Universal Smartphone Tabl...
U-pad III Aluminum iPad Tripod Adapter - 7.9-12.9in Metal Mount w Cold Shoe & Ac...
$39.95
Manfrotto Element MII Mobile Bluetooth 4-Section Carbon Fiber Traveler Tripod, B...
$191.95
Back to top
Using a Flat Screen
Some advices if you decide to use a flat screen display for laser training
- Using flat screen displays is better, because you don't have to worry about casting shadows
- Class 1 lasers that emit laser just for a short period of time are generally OK for flat screen
displays, and not going to damage the screen, but use them at
your own risk (we do).
- Apply a thin transparent plastic film to the screen that was designed for laser pointers
- The budget solution is one of these. Can be
used on notebooks and tablets, can be easily applied and removed and do not leave adhesives behind.
- Privacy filters are not good, these are essentially polarizing filters, that in fact reflect less laser
light, and even reduce the reflection angle.
- Test your filter at different angles, at the center of the screen as well as in the corners
Can I train on my TV?
You can display the targets directly on most TVs. If your smart TV has a built-in internet browser just go
to dryfireonline.com, or you can connect a laptop, notebook or game console to
your TV, and use it to display targets. It works fine - without laser training.
However, the answer is more complicated if you would like to use your TV with laser training.
In this case, consider the following:
- Most flat screen TVs have a anti-glare and polarizing filter.
- That means, most flat screen panels reflect very little light (including laser light) back to the viewer
(see the videos above), which is great when it comes to reducing screen glare when watching TV, but bad
when it comes to laser dry fire training. In other words, TVs are desgined for watching films and not
for laser dry fire training.
- The laser is reflected back from the screen in a very shallow angle.
- That means, the camera might not see the laser dot, that might lead to laser detection problems (missing
shots), even if you can see the laser, and the dot is visible from (reflected back to) the shooter's
point of view.
- If the camera can see the laser depends on a number of factors, like:
- The exact flat screen panel of your TV: How much laser and in what angles can it reflect?
- Screen size, and shot placement on the screen: Do you shoot at the center of the screen or close
to the edges?
- Where the camera is placed relative to the screen e.g. front of the screen, left/right of the
screen, and the camrea to screen distance
- Brightness of the laser - charge your batteries
It can happen, that the camera is placed in front of the screen, it can detect shots placed at the
center of the screen well, but shots out of the center and not detected.
- You might consider adding a light reflecting layer to the screen, that increases the amount of light
reflected back to the camera and improves the laser detection.
- In our videos we add a simple plastic (transparent frosted) sheet protector to the screen, but we
showcase it on small tablet an laptop screen. It might not work on a big screen TV.
- Similar films are available also for big screen TVs, even for professional office use. The problem is,
such professional films for big screen TVs cost (depends on the screen size as well) as much as a
low-mid level projector and difficult to apply bubble free. For this reason we recommend an entry- or
mid-level projector for big screen laser training.
- We do know that some of our users train with DIY solutions added to the screen (laminating film, tissue
paper, IKEA curtains, shower curtains, wrapping plastic). If you decide to do so:
- Use something that is transparent enough to see the screen, but not crystal clear, and a bit
frosted to reflect the laser
- Consider that you might once want to remove it from the screen, without damaging the panel
 Source: YouTube
Back to top
Using a Projector
Some advices if you decide to use a projector for laser training
- Project onto a flat and continuous surface where the entire image is
visible like in a movie
theater.
- If the projected image is broken or disturbed by objects (furniture, plants) the screen calibration
might
fail: use manual screen calibration and manually mark the screen
boundaries read more
- The projection surface shall reflect the laser back to the camera:
- Certain materials absorb too much light and do not reflect enough light back to the camera.
- If the projection surface is rough or uneven, it might disperse the light into unwanted
directions resulting in detection and precision issues.
- Resolution: The higher the better. Projectors with higher resolution
produce a sharper image, but
watch out: some manufacturers
advertise their projectors as high-resolution projectors because the projector can accept
high-resolution input, but its native resolution is lower, creating a blurry low-resolution image on the
wall.
- Brightness (lumens): Brighter is not always better since it might cause
laser detection issues if your
projector is too bright relative to your laser suppressing the
reflecting laser.
- Example: If you have a Class 1 laser then a 100-1000 lumens projector might work fine but a 3000 lumens
projector
might be too bright.
- If the camera cannot detect the laser on the screen, try the following:
- Move the camera closer to the projected image - but it shall
still see all four corners
- Try Manual Exposure Calibration read more
- Avoid using bright white (steel) targets, use darker targets
for testing and training
- Avoid using bright range background like images with white
clouds - use the solid gray
backgrounds for testing and training
- Reduce the brightness of the projected image:
- Reduce the lamp brightness of the projector (depends on the model)
- Switch the projector to Power Saving / Eco / Green Mode
- Put an ND
filter in front of the projector lens that makes the projected image darker. In
our tests budget level variable
(adjustable) ND filters worked fine.
Back to top
Our Projectors
Since many of you asked our advice on choosing a projector we decided to write a few words about the
projectors we use.
Please note that we are not expert on projectors, and the following is neither a buying advice nor a
recommendation of any sort - it's just an introduction of the projectors we have and our experiences with
them.
Budget Philips Projectors on Amazon
Philips, Neopix 150 home theater projector, Full HD 1920 x 1080p, 180 degree rot...
$139.00
Philips, Neopix 250 Home Cinema Projector, Full HD 1920 x 1080p, 180 Degree Rota...
$169.00
Philips, Neopix 450 SMART, Home cinema projector, Full HD 1920 x 1080p, 500 Lume...
$229.00
Philips NeoPix 750 Smart Home Theater Video Projector, 1920 x 1080 Full HD, 120-...
Epson Projectors on Amazon
Epson EpiqVision Flex CO-W01 Portable Projector 3-Chip 3LCD, Widescreen, 3000 Lu...
$329.99
Epson EX3290 3-Chip 3LCD Widescreen WXGA Video Projector with Built-In Speaker, ...
$599.99
Epson Lifestudio Pop Full HD Personal Lifestyle Projector 700 Lumens of Color an...
$619.00
Epson EpiqVision Mini EF22 Portable Smart Laser Projector, Bright 1,000 Lumens, ...
$942.98
Epson EpiqVision Ultra Short Throw LS300 3LCD Smart Laser Projector, 3600 Lumens...
Phone stands and tripods
GripTight ONE Mount (Black)
Joby GripTight Smartphone/Action Camera Flexible Tripod Stand Kit, Black/Charcoa...
ULANZI iPad Phone Tripod Mount Adapter with Cold Shoe, Universal Smartphone Tabl...
U-pad III Aluminum iPad Tripod Adapter - 7.9-12.9in Metal Mount w Cold Shoe & Ac...
$39.95
Manfrotto Element MII Mobile Bluetooth 4-Section Carbon Fiber Traveler Tripod, B...
$191.95

- Cost around $200
- It is small, lightweight and portable
- Has a built-in battery that lasts for about an hour - it's OK for a training session - but can
be powered via a USB port
- Comes with an own tripod and it has a standard thread - could mount it on any tripods
- It has built-in WiFi and supports Apple AirPlay - but we use it with a HDMI cable, since the
wireless connection causes a noticeable delay
- It has a simple lens, no zoom, no keystone
- The brightness is 150 lumens - can be used in gloomy/dark rooms, and it is not too bright for
our laser catridges
- qHD 960x540 resolution - it can accept Full HD 1920x1080 input signal, but it is going to
downscale it to 960x540 - that's okayish. When the projected screen is 65"+ the target contours
are not so sharp. That's OK with USPSA/IDPA and Steel targets, but not ideal for NRA-B18
precision shooting (screen distance 2 yards, target distance 25-30 yards) where the bullseye
zone becomes blurry.

- Cost around $500
- It is a typical office projector - not so portable
- Great colors and contrast thanks to its 3 LCD technology
- The lens has an optical zoom - it's great if you want to fine adjust the image size to perfectly
match a certain canvas size (like when mounting it on the ceiling)
- The lens has both horizonal and vertical keystone correction - when setting up the range the
projector can be placed on the side, left/right from the center of the screen, does not have to
be right at front of the screen
- The brightness is 3400 lumens - great bright picture, but with a downside: it is too bright for
our laser cartridge that caused detection issues since the light form the projector suppresses
the laser. It was solved by a cheap $30 variable ND
filter and two rubber bands (see the photo). Update: As it turned out, the 3400 lumen wasn't
too bright for our laser, but the battery was weak in the laser. Replaced the batteries, and now
the laser works fine with the Epson even without the ND filters. No more rubbers!
- Resolution is 1920x1200, that's above Full HD - sharp target contours even on a 80" screen
Back to top
Room Setup
The room where you setup your virtual range has an impact on your experience:
-
Safety first: The walls are thick
enough to stop a bullet.
-
Most laser training cartridges work best indoors.
-
It is best if you train in a room with controllable and stable lighting
conditions.
When training in a room with large
windows, keep in mind that lighting conditions can change rapidly as clouds move, leading to false laser
detections. You
might have to recalibrate your camera even during the training the session.
-
In dark environments the sensor of the camera captures a noisy image (higher ISO). If you train in
a dark room, automatic exposure calibration might fail and you have to manually adjust the exposure
levels.
-
Ideally you can adjust the lighting conditions: there are curtains,
shades, sun screens, or you can turn on/off or dim the lights.
-
Check the light sources in the room. Look for glares on the screen,
reflections, sources of sharp light (like alarm clocks or the standby
light of the TV) that the automatic exposure calibration might not compensate or overcompensate.
-
If you are using wireless connections: good wireless and Wi-Fi
reception. Interferences can lead to slow
connection and a delay between detecting and displaying your shots.
-
If you are projecting onto the wall: project onto a flat smooth
surface. Do not project onto curved wall with cracks. The laser dot (red or green laser)
shall be clearly visible on
the surface from all angles, use
non-absorbing, non-reflecting (mirror like) surfaces.
-
If you are using a projector: do not block the projected image, do not cast
shadows over the canvas - that can
lead to false laser detections.
-
Do not block the view of the camera, not even when you move, draw or
raise the gun - that can lead to missed and/or false laser detections.
-
Do not move the camera, after Screen Calibration is completed. If you
move the camera you have to perform Screen Calibration again.
Back to top
Camera Position
You have to put down the camera somewhere before the screen, at latest before Screen Calibration:
- The camera can be placed anywhere as long as the camera can see all four corners of the
screen.
- Use a stable cameara mount or tripod.
- You don't have to measure how far is the camera from the screen, because it doesn't influence how the
targets appear.
Some examples:
-
That's how a normal setup looks like:

-
Pinch to zoom if the camera is too far from the screen:

-
Extreme angles can also work - as long as all four corners are
visible for the camera - but the
cramped view might reduce the precision of detection in the farthest corners:
-
That's too much. Screen Calibration is going to fail since the
camera cannot see all corners of the projected image:
-
The best for precision is to place the camera right in front of the
screen - although it might hinder
your movement if you have a camera on a tripod in the middle of the room:

Back to top
Connect
First, connect the Camera App to your training session
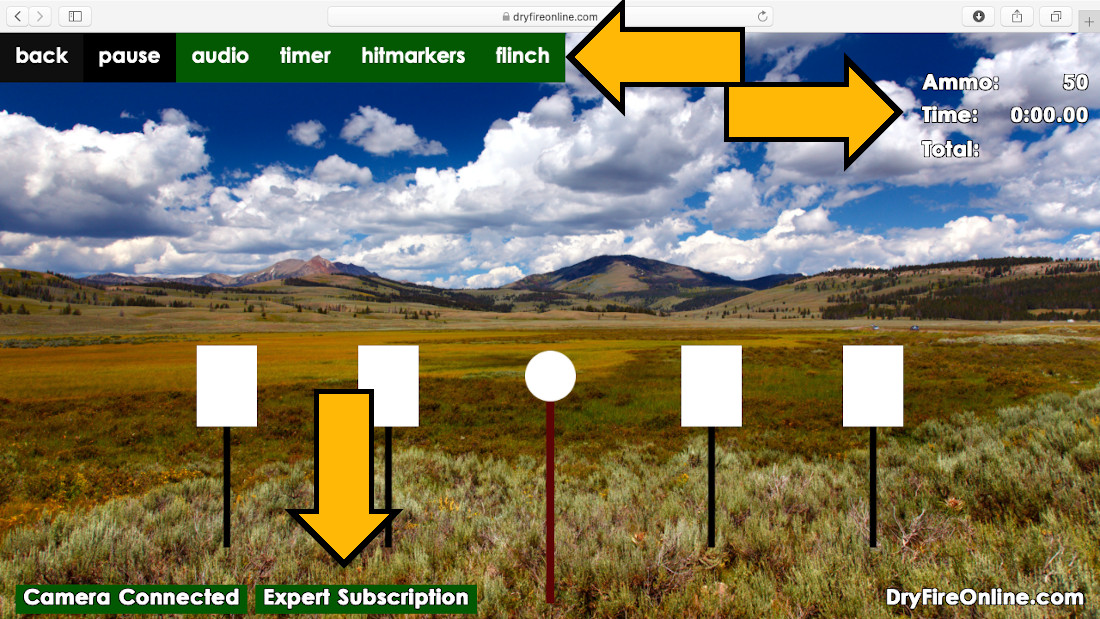
- In the Camera App: tap on the Connect button

- Enter your Connection ID. The Connection ID of your training
session is displayed at the bottom
left
corner of the Range Screen. Note: Make sure the laser training is enabled before you start the
stage

-
It is a 4-digit (new) or 9-digit (old) number.
-
Once the Camera App is connected to the Training Session, the Connect button turns green.

-
The Range screen will display the green Camera Connected
status message.

Back to top
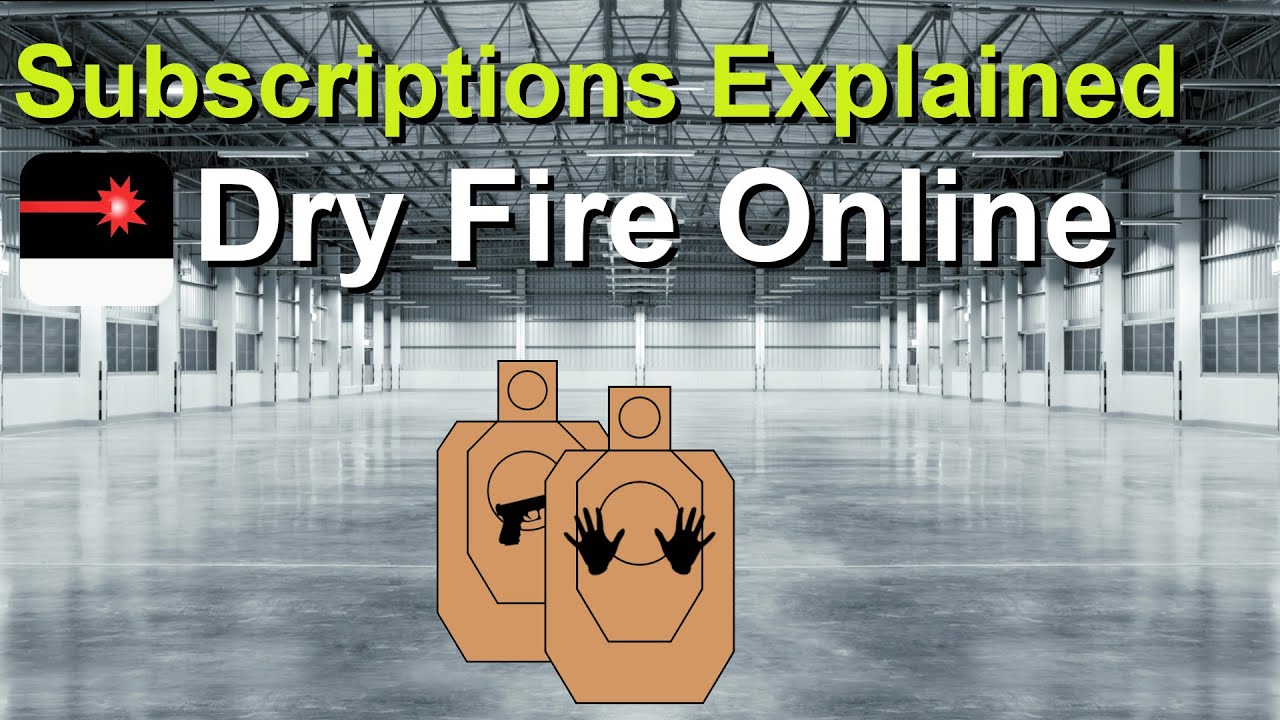
Subscriptions and Promo Codes
You need a subscription to be able to train with the camera app.
Limited offer: Unlimited stages and 2 shots (double tap) per round even
without a subscription!
A
Free Trial with
Free
Cancellation is available. Use it to test the Camera App without
spending any money. You are free to
cancel your subscription before the end of the trial period.
- If the “Not Subscribed” message appears at the bottom of the Range Screen, then you need to
subscribe
first.

In case you have an App Store Promo Code or Offer Code here is how to
redeem
it:
- Tap on the App Store icon
- On the “Today” screen scroll all-all-all the way down
- There you find the “Redeem” button

In case you do not have a Promo Code continue as follows:
- In the Camera App tap on Train on the left, then on Subscribe on the right.

- On the subscription screen, select the membership level you prefer.
Back to top
Subscription Levels
You can train as much as you want with any subscription level, but the number of laser shots
-
your “ammo” - is limited per round. Watch this video to see what it means:
Would you like to use Dry Fire Online for free without a subscription?
Check out our Promotional Access program, if:
All subscriptions are auto-renew subscriptions with monthly prices. All prices are in USD. You price
may vary depending on exchange rates and your local taxes.
How to subscribe in the Camera App:
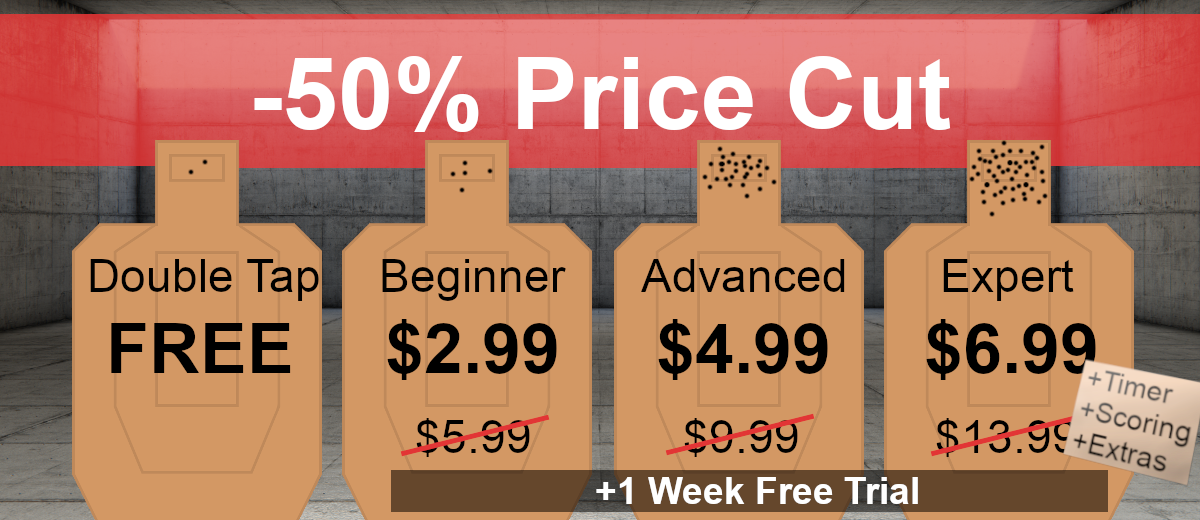
- Free Training - No Subscription: 2 shots per round
Recommended for:
- Double tap drills
- Testing Dry Fire Online with no strings attached
- Note: Free access might be temporarily/permanently suspended depending on server load -
sever resources in peak times are reserved for paying subscribers
- Beginner Subscription: 5 shots per round
Recommended for:
- New gun owners
- Double tap and Mozambique drills
- Steel Challenge stages
- SASP stages
- Advanced Subscription: 30 shots per round
Recommended for:
- El President drill
- USPSA, IDPA, PCSL, IPSC medium courses and classifiers
- Reload drills
- Falling Plates
- Expert Subscription: 50 shots per round
Recommended for:
- USPSA, IDPA, IPSC long courses and classifiers
Additional features of the Expert Subscription:
- Hit Scoring
- Score to Speech
- Shot Timer
- Flinch Detection
It is recommended to test if your setup (laser, projector, screen, phone) works fine with Dry Fire
Online before subscribing. Use a trial subscription or the free double tap training to test Dry
Fire Online free of charge.
Hint: If you have a Beginner or an Advanced subscription
and you shoot at steel targets and
enable the gunshot sound effects, you will hear “bang-cling” effect when you hit the steel
target.
Hint: If you are not sure which is the right subscription
for you, it is recommended to
start
your free trial with the Expert Subscription. It enables you to test all its
extra features
and
then cancel your subscription or downgrade
to Beginner or Advanced.
-
Once you completed the purchasing process via the App Store, the Subscribe button is going to
turn green.

-
The active subscription level can be seen at the bottom of the Range Screen.

Back to top
Cancelling Subscriptions
The payment and subscription process including all payments, renewals,
cancellations and
refunds are managed by your app store: Apple App Store or Google Play
without the participation of Dry Fire
Online.
In a nutshell: You send the subscription fee to Apple or Google and they forward it to us. Dry Fire Online
doesn't see your name, billing address or credit card number.
If you would like to cancel your subscription, you have to take action.
Here is how to cancel your subscription:
In case you need further assistance with managing your subscriptions or you would like to request a refund,
please
get in touch with Apple or Google.
Back to top
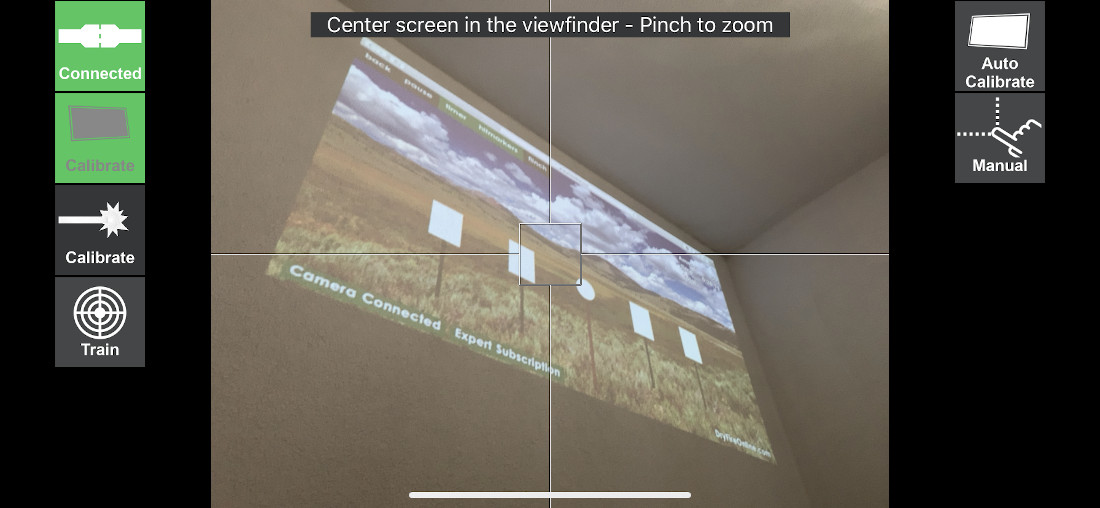
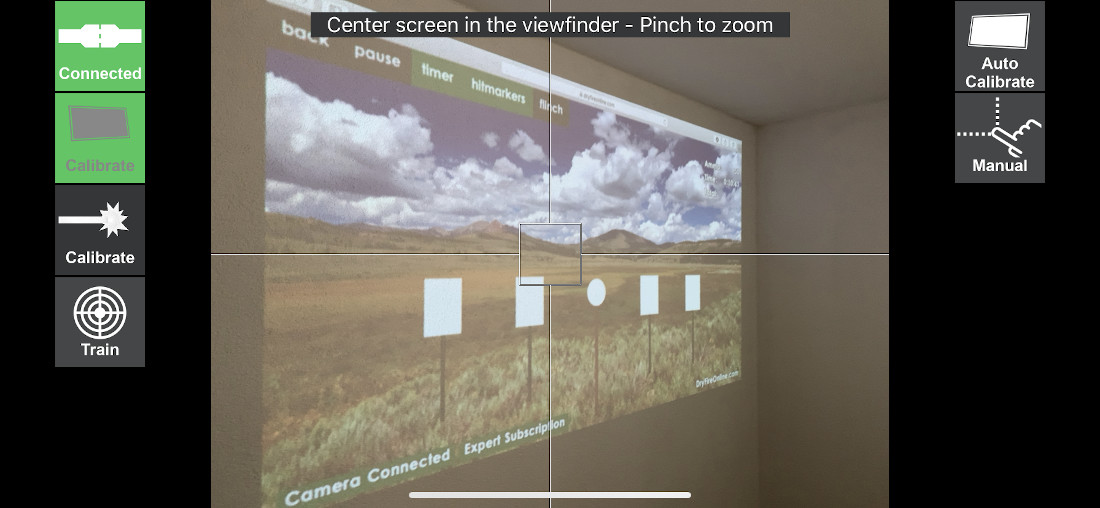
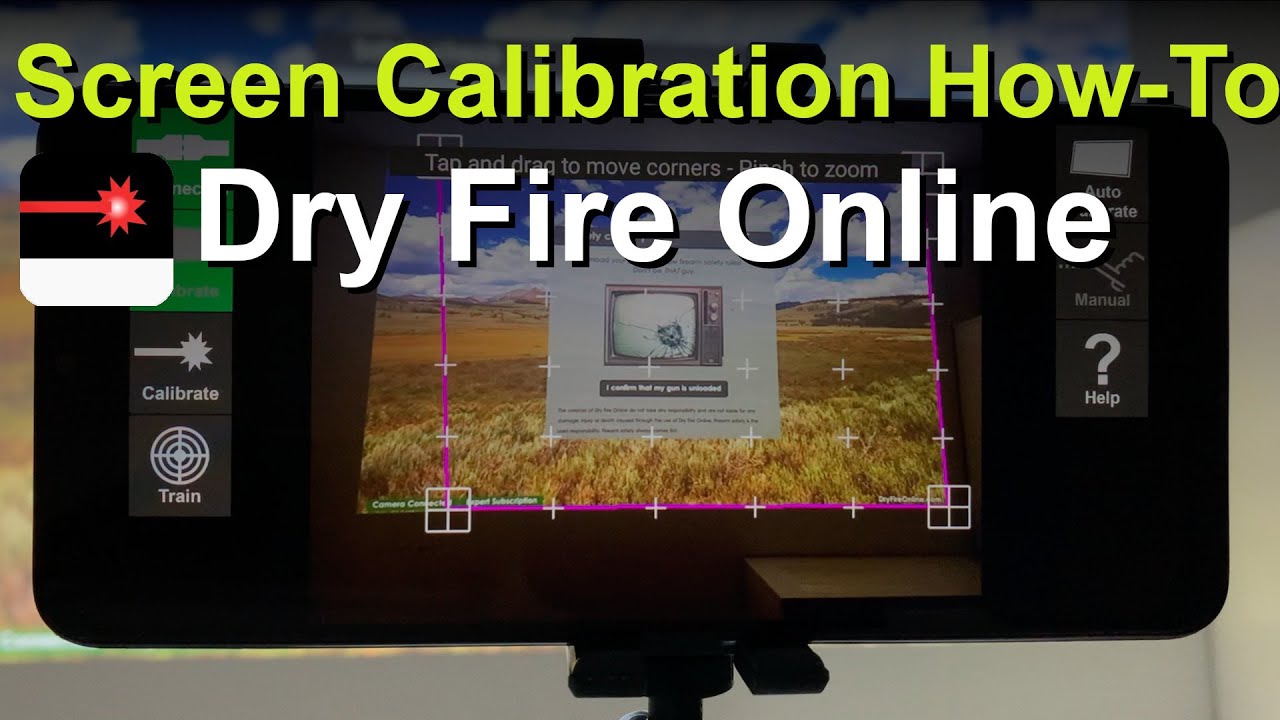
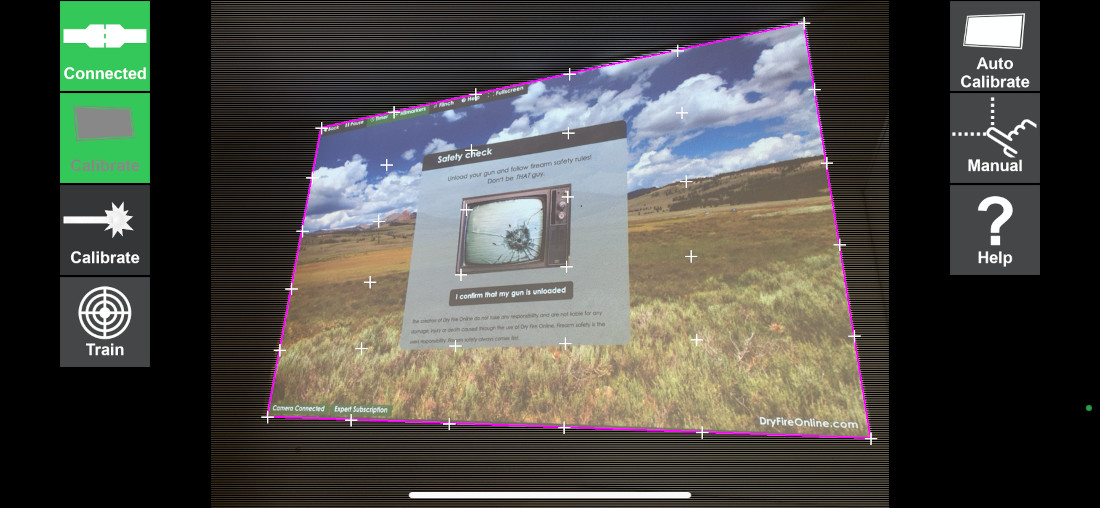
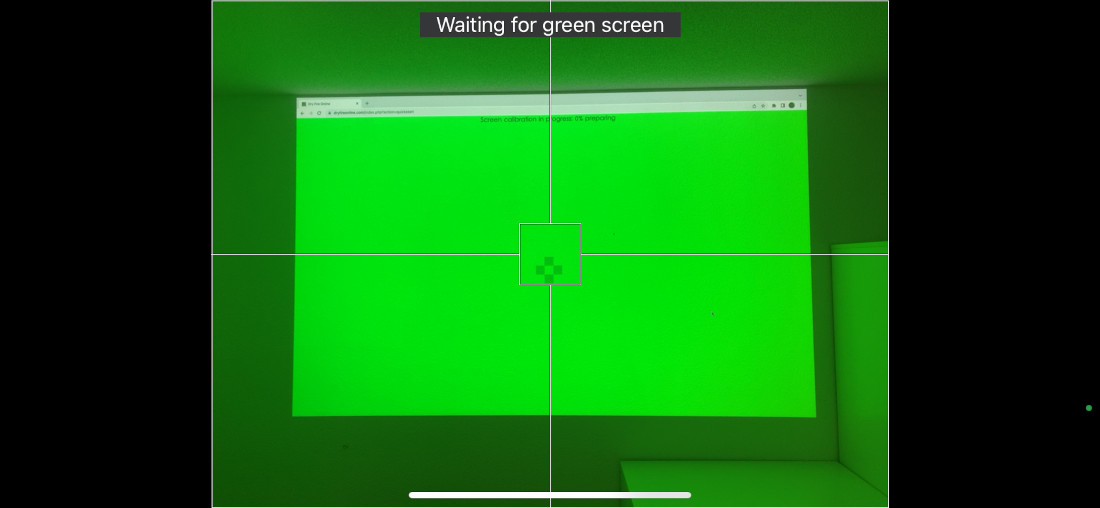
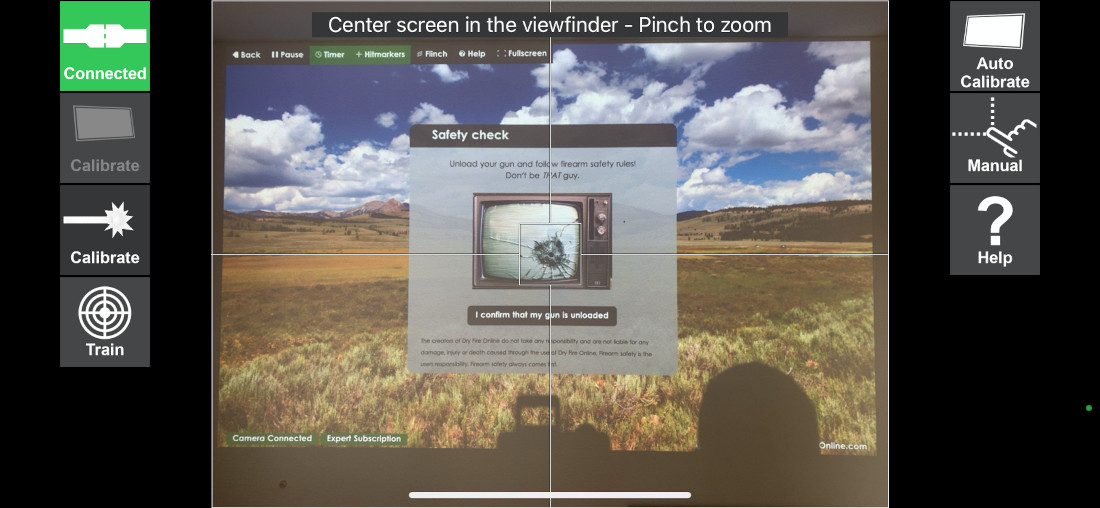
Automatic Screen Calibration
Screen Calibration means that the Camera App needs to know where your screen is located. Luckily,
there is a
button for that.
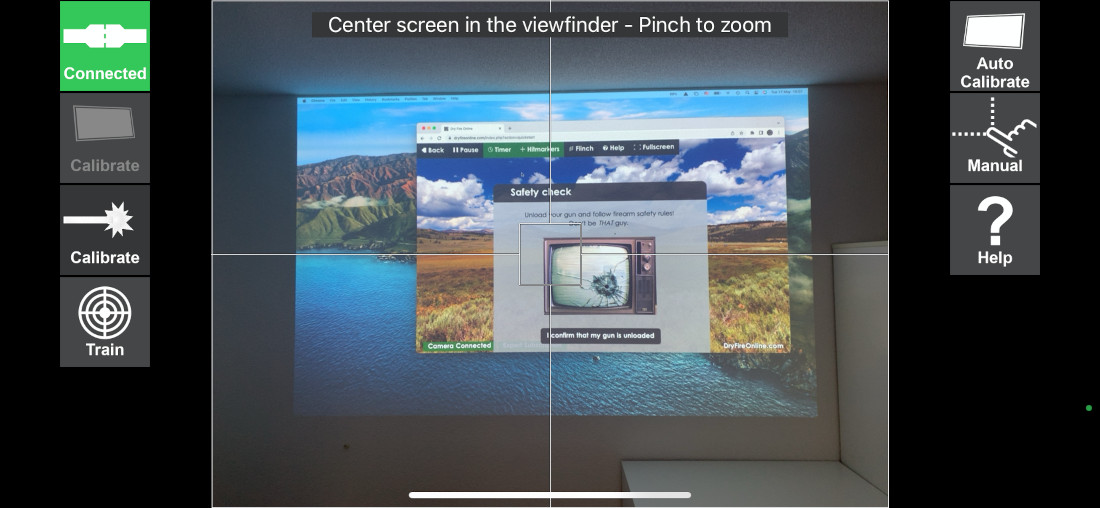
- Now it is time to put your camera into a stable mount that can
hold it steady. Good:

Not so good:

- Tap on Screen Calibration

- Make sure the Range Screen is (about) at the center of the
viewfinder. Use the crosshairs. Make
sure that all four corners of the Range Screen are visible within the
viewfinder, and each corner is
within the separate quadrant of the viewfinder, e.g.: the top/left corner is within
the
top-left
quadrant and so on.
Hint: You can place the camera left or right, above or
below the screen, it does not really matter. It does not have to be placed
right in front of the screen - as long as all four corners are visible.
Hint: You can pinch to zoom in, but all four corners of the
Range Screen shall be within the
viewfinder.
Might sound complicated, but it is simple. Should look something like this - centered, zoomed,
all four corners:


-
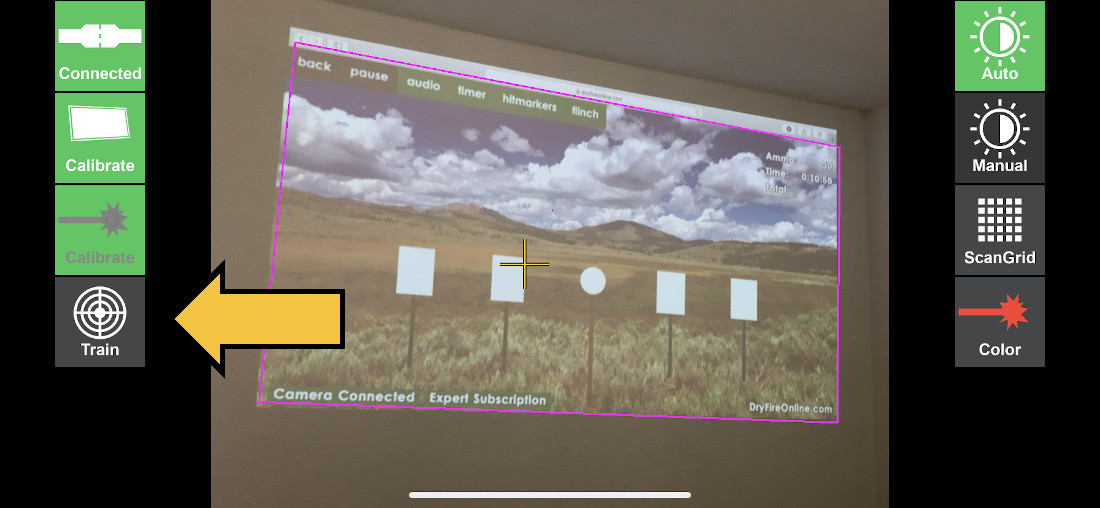
The Range Screen is going to display a green screen and the calibration process begins.

- Do not move, dance or jump around before the camera at this point. Do not disrupt the
calibration process.
- Wait until the progress counter reaches 100%.
- Once the calibration has been successfully completed the Screen
Calibration button
on the left turns green and
the borders of the green area should be marked by purple lines

If the automatic screen calibration fails:
- Check if there are any objects (flowers, books, furniture, anything) that might break or
obscure
the smooth continuous straight borders of the green screen.
Here a flower pot covers the bottom right corner of the green sceen.

And the calibration fails to detect the bottom right screen:

- Check if all 4 corners are visible on the camera
- The image what the camera sees lacks contrast: it is too bright in the room and/or the
projector is not bright enough (check its Lumens rating): temporarily darken the room,
at least for
the
period of the screen calibration. In a darker room, the projected image seems brighter,
that means more contrast, that means better detection.
Then tap again on Auto Calibrate. If it still doesn’t work, use Manual Calibration (read
below)
Back to
top
Pitfall #1: Screen Calibration
-
There is one thing to watch out for after Screen Calibration:
The automatic screen calibration should find the borders of the green screen, NOT the entire
image that's projected onto the wall. So, what is the difference?
It means, if your browser has a toolbar above or below the green area, or anything that does
not belong
to
the range screen (green area), that shall not be part of the detected screen area.
On the image below, you see an example where the automatic screen calibration completed and
found all borders of the screen. Except in the top left corner where it included even a part
of the
browser toolbar.


-
Here is how to fix it:
- Switch the browser to full-screen mode and make the toolbar disappear
- You can start the automatic screen calibration again
- Darken the room, and start automatic screen calibration again
- Use Manual Screen Calibration - see below
Back to
top
Manual Screen Calibration
-
In Manual Screen Calibration you can move the corners of the detected screen area by dragging
them with your fingertips.
-
Tap on “Manual”

-
Tap on any of the corners, hold and drag them on the screen until the corners and the
borders
correctly align with the green area of the Range Screen.
Hint: you do not have to tap exactly onto the corner
marker, it is OK if you tap close to
it.
Otherwise your fingers would cover the corner, and you would not see where you are dragging
to.

In this case the top left corner was moved a bit downwards onto the correct corner.

Now it is Okay.
Back to
top
Pitfall #2: Moving the Camera

-
In this case, repeat the Screen Calibration process.
This is the end of the Quick Setup Guide. If you have reached this point, the Camera App is ready to use.
You can start the stage on the Range Screen.
At the beginning of each stage, the Range Screen displays a special calibration screen and asks the Camera
App to perform Automatic Exposure Calibration that is going to set the right exposure levels. Then you are
ready to go!

Read the rest of the Manual in case you have issues like:
- No laser detected
- False laser detected
- Precision issues
Back to
top
Automatic Exposure Calibration
Exposure Calibration means that the Camera App needs to capture images where the laser dot is recognizable.
The captured images shall be balanced and match
the current lighting conditions: shall neither be too dark (no laser detected) nor too bright
(false laser detected).
-
Important: This calibration step takes place unless you have
switched the Camera App to Manual Exposure. In that case the values you have set manually have
priority and will not be overridden by
the automatic calibration.
-
The Automatic Exposure Calibration at the beginning of each stage provides acceptable exposure
settings
under most circumstances. However, in some situations (like when the room is dark, the targets are
bright, the camera ISO settings are high, there is noticeable noise/grain on the image) the
automatic calibration is not good enough.
In such cases you can manually start the Automatic Exposure
Calibration by tapping on Laser Calibration:

-
You can start Automatic Exposure Calibration anytime, even
without
the special calibration screen being
displayed, even at the middle of a stage when the targets are
displayed.
Actually, in some cases this
approach is even better than calibrating on the Calibration Screen. Example: you
train
in a
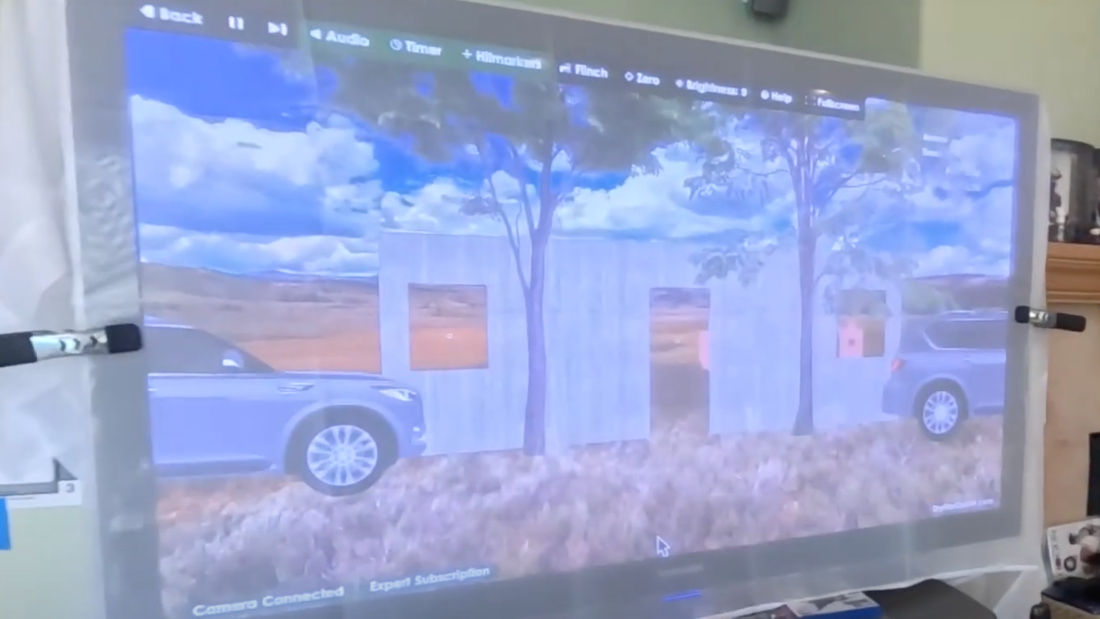
dark room and you have a lot of bright white targets on the screen. Calibrating mid-stage:

Back
to top
Testing the Laser Detection

- Step 2:
- DO FIRE with the laser.
- The Camera App SHALL this time detect a single laser dot.
- A '+' marker SHALL now appear briefly on the viewfinder marking the spot where the Camera
App
detected
the laser
Notice the '+' on the image below

- You might want to repeat these steps on:
- The center of the screen where most targets appear - that
is
the most important area of the screen.
- The corners and edges of the screen - especially if you
have a
big screen.
- Note that detection issues can be due to a number of various factors, like:
- How much laser light the screen surface absorbs and reflects, and reflects into
which
direction.
It can be that you see a bright laser (red or green) dot on the screen, but from the
camera the same
laser
dot is
not even visible (rough surfaces, anti-glare and polarizing screen coatings, etc.).
See
Projector or Flat Screen
- The distance of the camera and the screen - the closer the better, but remember: the
camera must
see all four corners of the screen
- The resolution and the frame rate of your camera
- The brightness of the laser dot and how long it is emitted
- Ambient lighting relative to the brightness of the screen
- Changing lighting conditions (sun comes up and shines through the window), exposure
levels
change, glares, bright spots appear on the screen
-
Error #1: If the '+' hitmarker
appears (either continuously or just periodically blinking) on the viewfinder even when you DO NOT fire, then the Camera
App detects false laser dots . Certain parts of the image are too bright. In this
case
you can repeat the Automatic Screen Calibration, or you can set the exposure levels maunally by
Manual Exposure Calibration.
-
Error #2: If the '+' hitmarker DOES
NOT
appear at all, not even when you DO fire, then the
Camera
App cannot detect the laser. The image can be too dark, and you can repeat the exposure
calibration.
In some cases, this problem has other root causes: like the
battery
of the laser cartridge is dying, some cartridges might wear out, the laser dot gets dim, or
the
surface where the laser dot should appear absorbs too much
laser and does not reflect enough back to the camera. If you are using a projector: your projector might be too bright compared to your
laser.
-
Hint: You can perform exposure calibration in the app even when the range screen displays the
targets. Sometimes, when the automatic exposure calibration does not work well enough (dark
room,
bright white targets) it is better to restart the exposure calibration manually once the
targets are on the screen. Tap on Automatic Exposure Calibration in the Camera App, wait until
the
calibration completes, then (remember to) switch the Camera App back to Train mode!
Back to top
Manual Exposure Calibration
Example video about manual calibration:
-
To adjust the exposure calibration values manually, tap on
Manual
A panel appears at the bottom of the viewfinder where you can adjust the exposure values.

-
- The values represent the brightness of the image and are measured on a scale of 0-255, where 0 is black and 255 is white.
- Laser Threshold: points above this brightness are seen as
laser
dots. Ideally no parts of the
image (other than the actual laser dot) shall be brighter than this, otherwise that will be
seen
as a laser dot.
- Brightness: is the brightness of the brightest spot on the
image
- Notice that the value next to brightness slightly
fluctuates
depending on how much noise the
image contains (darker room, higher ISO, more nosie)
- You can change both values but changing the sliders
- Important: If you change any of the values, the exposure
calibration will change to manual mode
and the Manual button turns green. That means, from now on
the
values you set manually have
priority, and the automatic exposure calibration at the beginning of each stage will be
skipped.
- If you want to switch back to Automatic Exposure
Calibration
again, tap on Auto, the automatic
calibration will be performed, and the Auto button turns green again.
-
The goal is that the image should be neither to dark nor too
bright,
and if you fire the laser, the
laser dot (an only that) shall be the brightest spot on the image.

Back to
top
Scan Grid
The Scan Grid button changes the density of the laser scanning pattern. The denser the better the
detection
quality but also makes the scanning slower. You do not need to change this setting unless the "Frame
Dropped" warning frequently appears.

Back to
top
Laser Color
The Laser Color button changes the color of the laser the camera app is trying to detect. The default
setting is red (for red laser), but it can be changed to green (for green lasers) that gives priority to the
green RGB
component.

Train
Back to top
Subscription
The details of the Subscription button are described here: Subscriptions and Promo Codes
Back to top
Sound

-
The Camera App Sounds button is independent of the Audio button on the Range Screen Toolbar. Enabling or
disabling sounds in the Camera App does not influence the sounds of the Range Screen, and
vice
versa.
-
The Camera App plays the gunshot sound only when it is switched to
Train mode. Make sure your phone or tablet is not in
Silent
Mode.
-
When the Camera App plays a gunshot sound the detected hit is sent to the Range Screen, but
the
Range Screen is going to display it only during the Commence Fire
phase (when the clock is running).
-
When the Camera App plays a gunshot sound the detected hit is going to appear on the Range
Screen
after a short delay depending on network latency.
Back to
top
Flinch

-
Flinch Detection requires Expert Level subscription
-
Flinch Detection shall be activated both in the Camera App
(if
trace detection is active), and on the
Range screen as well (if the trace is displayed or hidden). See the Flinch button on the Toolbar
-
The length of the Flinch Trace depends on how much you move
the
barrel and how long your laser
cartridge emits laser.
-
Flinch Detection works better in dark, so make the room
darker for better Flinch detection.
Back to top

 This is the screen diagonal. It is nothing special, that's how the screen size is measured. If you have a
flat screen TV it is probably written on the TV or on the package. If you have a projector, you can measure
the projected image or the canvas. Just make sure the projected image is rectangular and projected onto a
flat surface.
This is the screen diagonal. It is nothing special, that's how the screen size is measured. If you have a
flat screen TV it is probably written on the TV or on the package. If you have a projector, you can measure
the projected image or the canvas. Just make sure the projected image is rectangular and projected onto a
flat surface.
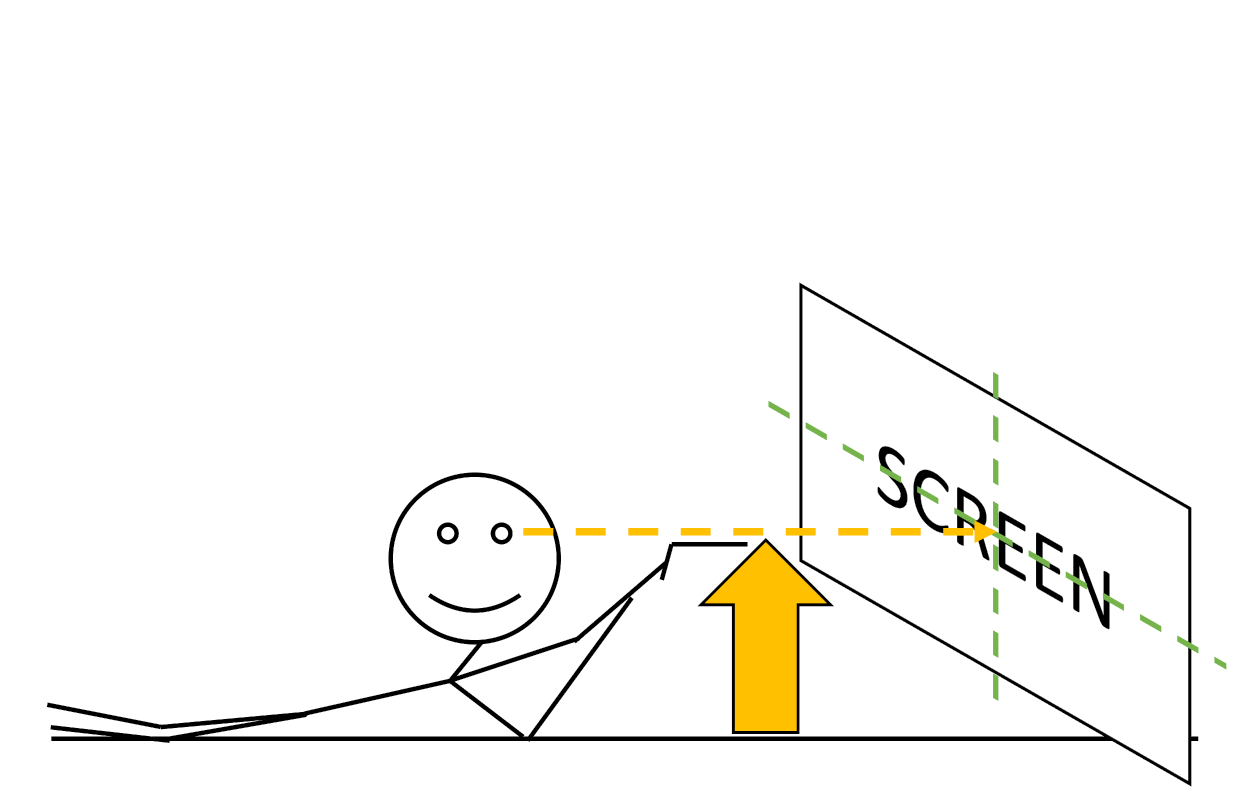
 The screen distance is how far you stand from the screen. Note the following:
 The ‘shooter eye height’ is ideally the height of your eyes (viewpoint, camera, whatever) from the ground.
Note the following:
The ‘shooter eye height’ is ideally the height of your eyes (viewpoint, camera, whatever) from the ground.
Note the following:
 For the best experience switch your browser to full screen (instead of some windowed) mode. The center of
the screen is ideally on the same height as the ‘shooter eye height’. In other words, when the shooter
naturally looks ahead, the center of the screen is right in front of his face.
For the best experience switch your browser to full screen (instead of some windowed) mode. The center of
the screen is ideally on the same height as the ‘shooter eye height’. In other words, when the shooter
naturally looks ahead, the center of the screen is right in front of his face.


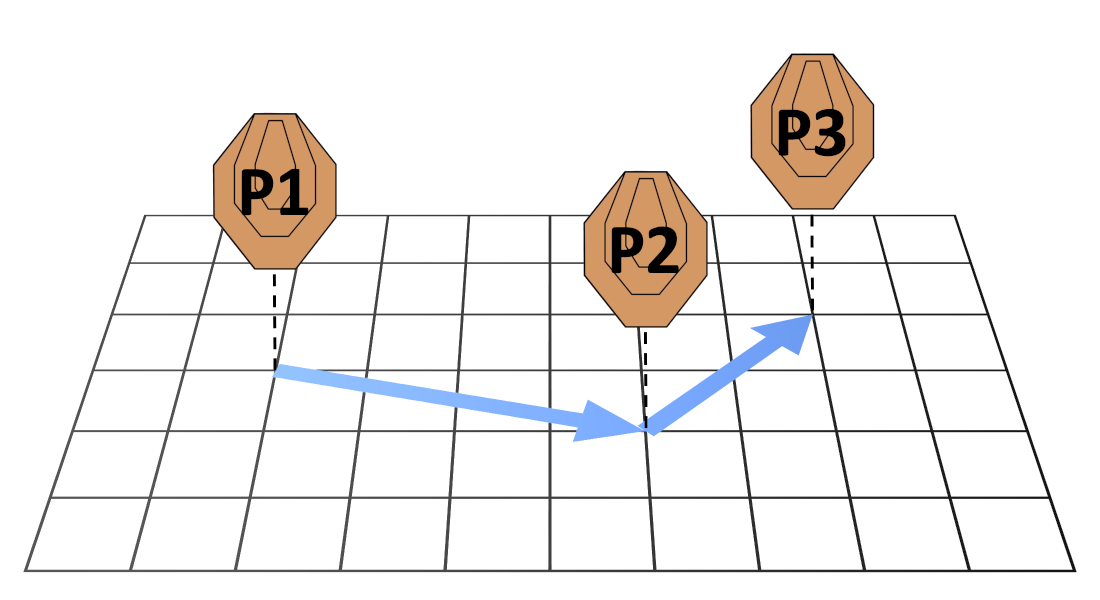
 Target positions are defined by 3 parameters:
 Keep in mind that in Dry Fire Online the targets are positioned by - and the target parameters define - the
center of the target.
If your stage description defines the relative target distances by edge-to-edge, then you have to transform
it to center-to-center distances by considering the width of the targets. In this case it can be useful to
change the unit of measure, for instance to define the values in inches instead of feet.
Keep in mind that in Dry Fire Online the targets are positioned by - and the target parameters define - the
center of the target.
If your stage description defines the relative target distances by edge-to-edge, then you have to transform
it to center-to-center distances by considering the width of the targets. In this case it can be useful to
change the unit of measure, for instance to define the values in inches instead of feet.
 If you change the target
  The Stage Builder Menu contains the following options:


 The Target Details panel can be scrolled up/down to display all properties.


 After you start the stage and confirm that your gun is unloaded, the Connection ID will be displayed in a
popup and even at the bottom left corner of the screen. Use this number to connect the Camera App to the
training session.
After you start the stage and confirm that your gun is unloaded, the Connection ID will be displayed in a
popup and even at the bottom left corner of the screen. Use this number to connect the Camera App to the
training session.


 If that would happen, you can do the following:


 If you want to practice long range shooting with a scope, you are going to see the pixelated image of the
target - depending on the distance and on the screen resolution it will be more or less usable. It is like
watching TV via binoculars. You are not going to see more details, but you are going to see the pixels of
the LCD panel. Note also that the focal distance is also much shorter since the screen is closer than the
simulated target.
If you want to practice long range shooting with a scope, you are going to see the pixelated image of the
target - depending on the distance and on the screen resolution it will be more or less usable. It is like
watching TV via binoculars. You are not going to see more details, but you are going to see the pixels of
the LCD panel. Note also that the focal distance is also much shorter since the screen is closer than the
simulated target.